Im just making this tut for people who are having difficulties and would like to skip all the beginner stuff and jump right in 
i get all my brushes from deviantart. loyal downloader of corse.
i can give you the names but i cant get links as some are old.
to start i would sugest new canvas at 400x120.
make sure the colour palete is black to white ( to do this just press D ).
Now once done hit Ctrl+ backspace to colour the background if its not already.
Now to start il just brush lightly
( this brush is killers_dirty_brush_set_2 )
1.

2.
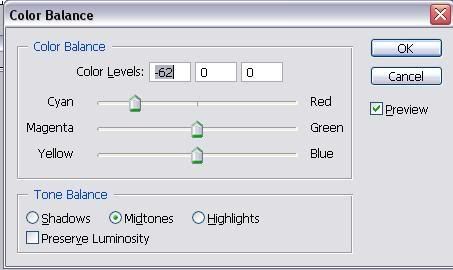
now we need to colour it. hit Ctrl+b to bring up colour balance. and then add these settings ( you dont have to use the colour i do)
3.
now your sig should be this.

now remember people you dont have to sue my brushes this is just a guide on what to do with them thats all.
4.
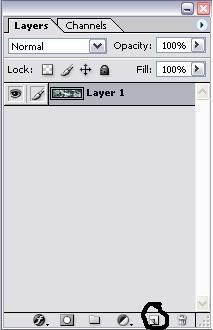
now lets add another layer. we need to go to new layer either by going along the top to layer/new/layer or hitting this lil button.
now once made we need to give it a background. so hit X button and the colour palete should change from black to white to white to black.
then hit ctrl+backspace.
background should be black. now we need to continue brushing on this layer but lightly. dont use brushes that would make it to bright or to dark.
my second layer is this for example.

this brush is called abyss_grungeset2
5.
we go along the same principle untill we have at least 15-20 layers done. now mine has been done quickly to give you an example with what you could end up with.
after 17 layers i boiled it down to this

now every layer except layer one we need to overlay. this can be done by the drop down above the layer section. click a layer and then from the drop down which is located here.

now when u make your so many layers its not say you have to stick with that amount. this is the time consumming part. there are Eyes next to each layer. click one of them off or delete layers you think are not suitable. untill you come to a reasonable amount of layers, i recommend staying above ten as sometimes i have over 30 layers and love it doesnt bother me. its really just to start you off to give you a rough idea as to what to do next.
now once you have sorted your layers and have coloured them and overlayed we need to either add more to it which is what you see fit with. maybe more layers to make it more eye candy or which ever you like. but stick to the principle i have shown you here.
now lets add a picture...i have colossus from xmen so il add him. You can find pre cut renders but i cut all my own. i never like to use pre cut renders but there are some places out there that do it.
so i cut out colossus and i put it in but he seemed a bit off. so i ctrl+b on his layer and put a bit of cyan on him and he has ended up blending nicely with the BG as your can see.

6.
now with him like that we cant just leave him. we can either do 2 things. create a duplicate layer and then overlay him and motion blur him. or we can make some random feature from the filter gallery which is under filter along the top.
now in this i have added a motion blur but lightly. you can do this also. by going to filters along the top and then go to blur/motion blur and move the slider accordingly.

Now with that added we can move on to either font or border. pick a font that goes well with the render and background.
ive used the font Made in china from dafont.com

now time to add the border. pretty simple really.
make a new layer as described above. hit ctrl+a and you should see a marquee around the edges of your sig. now just go to edit along the top and then go to stoke. use the following settings.
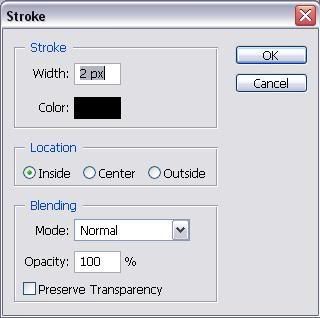
now you can sue whatever settings im just giving you a rough idea here.
now once the border is done, its not to say your finished, if your like me i would normally add more layers and take my time making sure its ok for the sig. now you can add a quote when your done that goes with the sig, but i havent as im not in favour of them to be honest.
mine turned out like this.

Now please this is just a beginner tut, to explain everything to the very thing that i do would take me a while and alot of screenshots, so im sorry but i dont have that kinda time.
Now post your results i would like to see them. hope you have enjoyed doing this tutorial
  .
.
-Blade
i get all my brushes from deviantart. loyal downloader of corse.
i can give you the names but i cant get links as some are old.
to start i would sugest new canvas at 400x120.
make sure the colour palete is black to white ( to do this just press D ).
Now once done hit Ctrl+ backspace to colour the background if its not already.
Now to start il just brush lightly
( this brush is killers_dirty_brush_set_2 )
1.

2.
now we need to colour it. hit Ctrl+b to bring up colour balance. and then add these settings ( you dont have to use the colour i do)

3.
now your sig should be this.

now remember people you dont have to sue my brushes this is just a guide on what to do with them thats all.
4.
now lets add another layer. we need to go to new layer either by going along the top to layer/new/layer or hitting this lil button.

now once made we need to give it a background. so hit X button and the colour palete should change from black to white to white to black.
then hit ctrl+backspace.
background should be black. now we need to continue brushing on this layer but lightly. dont use brushes that would make it to bright or to dark.
my second layer is this for example.

this brush is called abyss_grungeset2
5.
we go along the same principle untill we have at least 15-20 layers done. now mine has been done quickly to give you an example with what you could end up with.
after 17 layers i boiled it down to this

now every layer except layer one we need to overlay. this can be done by the drop down above the layer section. click a layer and then from the drop down which is located here.

now when u make your so many layers its not say you have to stick with that amount. this is the time consumming part. there are Eyes next to each layer. click one of them off or delete layers you think are not suitable. untill you come to a reasonable amount of layers, i recommend staying above ten as sometimes i have over 30 layers and love it doesnt bother me. its really just to start you off to give you a rough idea as to what to do next.
now once you have sorted your layers and have coloured them and overlayed we need to either add more to it which is what you see fit with. maybe more layers to make it more eye candy or which ever you like. but stick to the principle i have shown you here.
now lets add a picture...i have colossus from xmen so il add him. You can find pre cut renders but i cut all my own. i never like to use pre cut renders but there are some places out there that do it.
so i cut out colossus and i put it in but he seemed a bit off. so i ctrl+b on his layer and put a bit of cyan on him and he has ended up blending nicely with the BG as your can see.

6.
now with him like that we cant just leave him. we can either do 2 things. create a duplicate layer and then overlay him and motion blur him. or we can make some random feature from the filter gallery which is under filter along the top.
now in this i have added a motion blur but lightly. you can do this also. by going to filters along the top and then go to blur/motion blur and move the slider accordingly.

Now with that added we can move on to either font or border. pick a font that goes well with the render and background.
ive used the font Made in china from dafont.com

now time to add the border. pretty simple really.
make a new layer as described above. hit ctrl+a and you should see a marquee around the edges of your sig. now just go to edit along the top and then go to stoke. use the following settings.

now you can sue whatever settings im just giving you a rough idea here.
now once the border is done, its not to say your finished, if your like me i would normally add more layers and take my time making sure its ok for the sig. now you can add a quote when your done that goes with the sig, but i havent as im not in favour of them to be honest.
mine turned out like this.

Now please this is just a beginner tut, to explain everything to the very thing that i do would take me a while and alot of screenshots, so im sorry but i dont have that kinda time.
Now post your results i would like to see them.
-Blade


