Senbou's Weapons for Jedi Academy Tutorial
Hello new weapons makers :D
Today I will walk you through step by step on how to make a weapon for JA and to bring it to life in the game itself ^^
Note: if you need help at any time during this tut you can PM me on forums, MSN me at matt_hayes_gd@hotmail.com
Tools of the Trade
First off you want to make sure you have specific tools to do the job, you will need:
3D modeling programs: this tutorial will be using 3DS Max 2009 for the major bulk of the modeling process, as well as Milkshape 3D 1.8.2 for positioning and conversion {if you already have 3DS max, good for you, but milkshape is a must for this method >.>;}
Next you will be needing an .md3 importing script for 3DS Max
Ok, now for the most important programs:
MD3View - this program doesn’t require an install and allows you to see your model much how it would look ingame, this program is also important for you to convert to the final file type for the setup
Modview - this is another non installation program that allows you to again see your model much how it’s shown ingame, it also provides an easy way to reskin a model and let you know weather the model will work ingame {more on that topic later on}
Pakscape - another non installation program that lets you 'pack' your files together and save them as the desired format, .pk3
Photoshop or other imaging software - this is a must if you want a nice texture for your weapon ^^
Ok those are basically all the tools you will need to get going, please note that a lot of the time your first models that you send ingame might come out a little hokie.
Milkshape 3D 1.8.2: http://www.4shared.com/file/215063616/d ... 3d182.html
MD3 Importer: http://www.4shared.com/file/215045110/b ... 3-md3.html {note: this must be placed in this sort of directory- C:\Program Files\Autodesk\3ds Max 2009\Scripts\Startup. Also note that this only works for the 32bit version}
MD3View: http://www.4shared.com/file/215043786/a ... 3View.html
Modview: http://www.4shared.com/file/215043780/4 ... dView.html
Pakscape: http://www.4shared.com/file/215043776/2 ... Scape.html
Sword .PK3 Template: http://www.4shared.com/file/215435284/4 ... plate.html {we get to use this later}
Requirements and Parameters
Alright JA runs on a Quake 3 rendering engine, this means there's a limit to how fancy you can make your weapons. A model is comprised of 3 things that make up its structure: polys: the 'face' of the model, what makes it look the way it does, edges: lines that act as supports for the different pieces of polys, and verts: the little dots that act as anchors for the edges. The most important limitation we have is the vert limit; each object MUST have less than 1,000 verts, sounds simple huh, well it’s surprisingly hard to get the amount of detail you want and stay below that, trust me ;).
But you may be asking, what’s an object? Well, an object is what makes the model, take a sword for example; there are about 3 objects, a model that makes the handle, the guard and the blade, so basically you can have as much detail as you want so long as each piece has less than 1,000 verts. There is also a poly limit, but I actually never bothered to worry about that, can you imagine a sword model that has over 10,000 polys? XD
It is important to also have a special folder setup for moding and such, so go to your desktop and create a folder called Base, inside this folder make several other folders: ext_data, models and shaders. Inside ext_data make another folder called sabers. Inside models make another folder called weapons2. sabers is the folder that will hold the saber text file you will be making later on, and weapons2 will have another folder with whatever name you want this is where all the textures and other assorted files for your weapon will be saved. Shaders we may talk about later if you are interested enough.
Getting started
Alright, we are ready to make our sword models
Step 1: find you reference {just go on Google or yahoo image search and type in the sword you want, my example here is katana, and I found this:

Step 2: put the image in 3DS Max, just click hold and drag it to Max and it’ll show this box after it has been loaded:
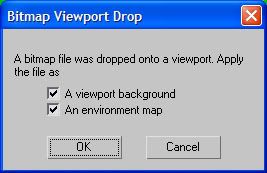
You want to click OK, it’ll pop up a second time, this time you just hit the red X, now your reference image is on the viewport where you dropped it
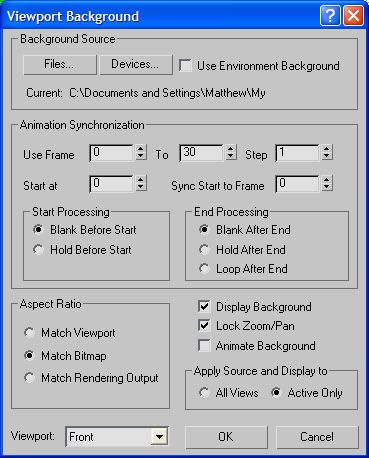
step 3: fix any issue there may be with the image {squashed in some spots, you cant accurately zoom in} hold Alt and hit B, this will open this box:

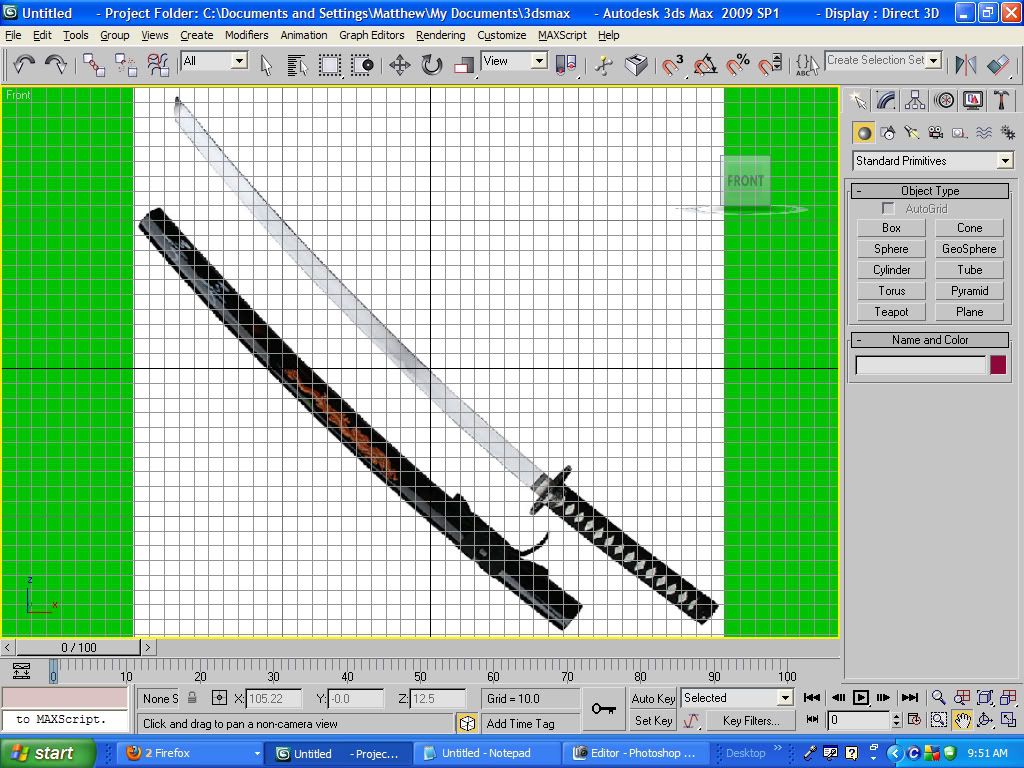
you want to click the bubble labeled Match Bitmap, this will allow a checkbox to be clicked called Lock Zoom/Pan, check that box and hit OK. Now your ref is lock into place so that it’ll move with the model and zoom in and out with you model, this provides good accuracy:
Step 4: get modeling! Hit F3 on your keyboard to make polys visible. as this is a sword it makes sense to start with the blade, so go to your create menu, and choose the geometry button, it will automatically have the Standard Primitives selected in the drop down menu, then choose Plane, this will open a little entry menu underneath, here you want to change Length and Width Segs to 1. now click anywhere near the sword and drag out the panel you are making down its whole length {I usually edit my image to have the blade standing straight up and down but this is fine for now}:
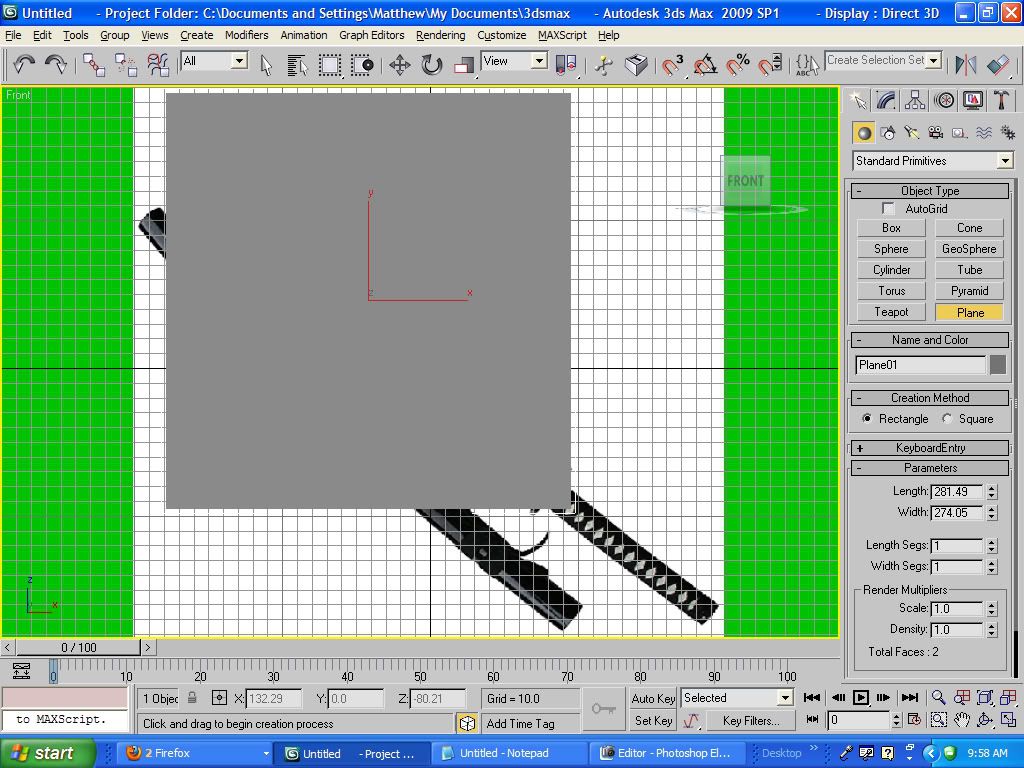
now this is really important, it is always best to 0 out the coordinates of all of you objects, so we want to do this every time we make an object, so using the Move Transform Type-in dialog box we want to click inside each of the coordinates {X: side to side, Y: forward and back and Z: up and down} and make each number 0:
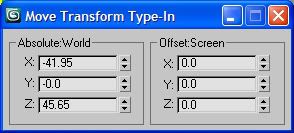
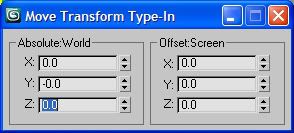
That will move our Pane to the exact center of the workspace
Now, right-click the object you made and choose Convert To, and then convert to Editable Poly:
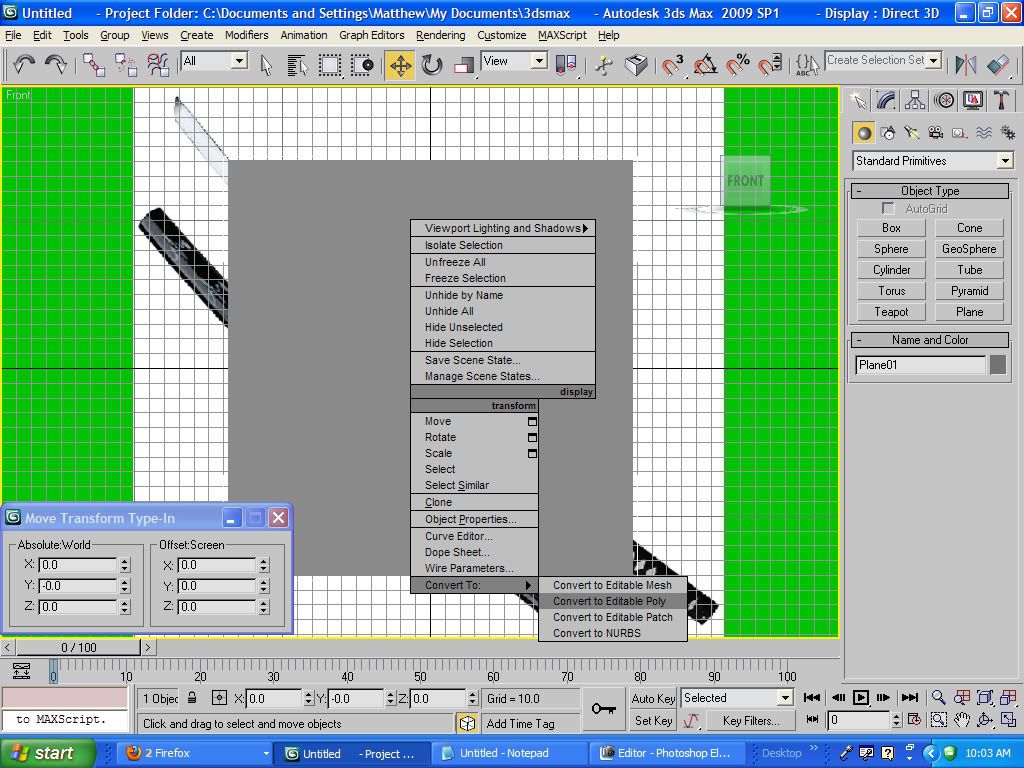
this is really important as you want to be able to edit the structure of this plane
Now we want to hold Alt and hit X on our keyboard, this will make our currently selected object see through to make it easier to shape:
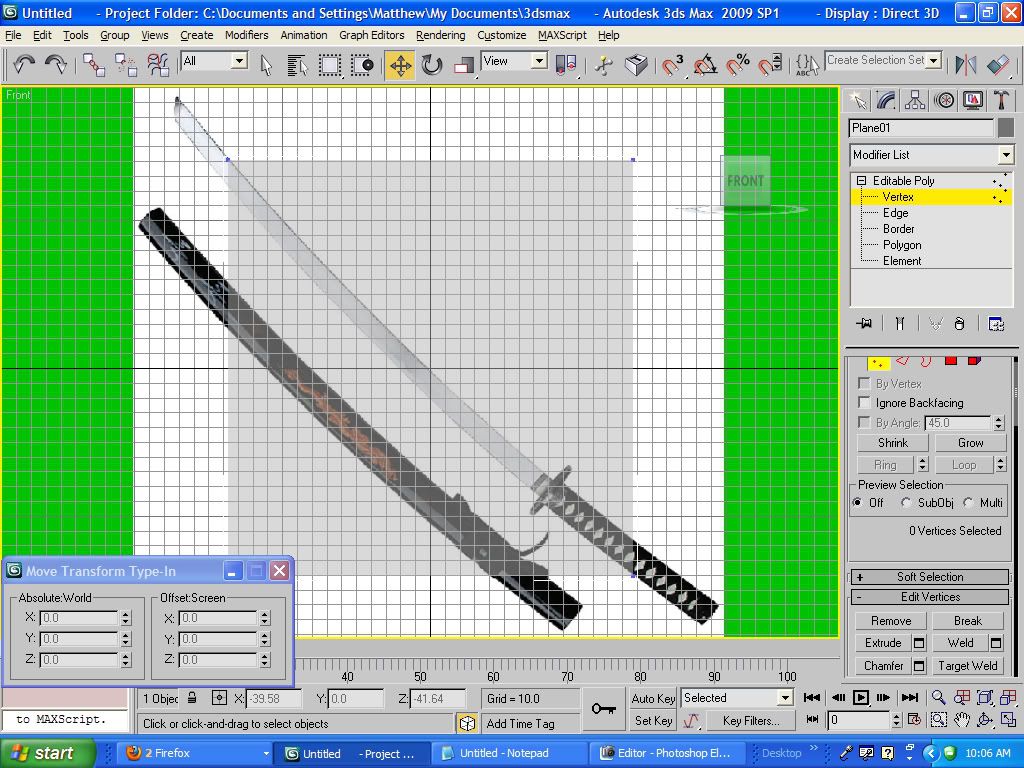
Now hit Ctrl+A to select all of your verts and move them to the area that the object was originally, this wont change the 0'd out coordinates we set earlier, as this is a deeper editing
next, we want to keep the verts option selected and right-click our mouse to open the verts editing tools and we want to choose cut:
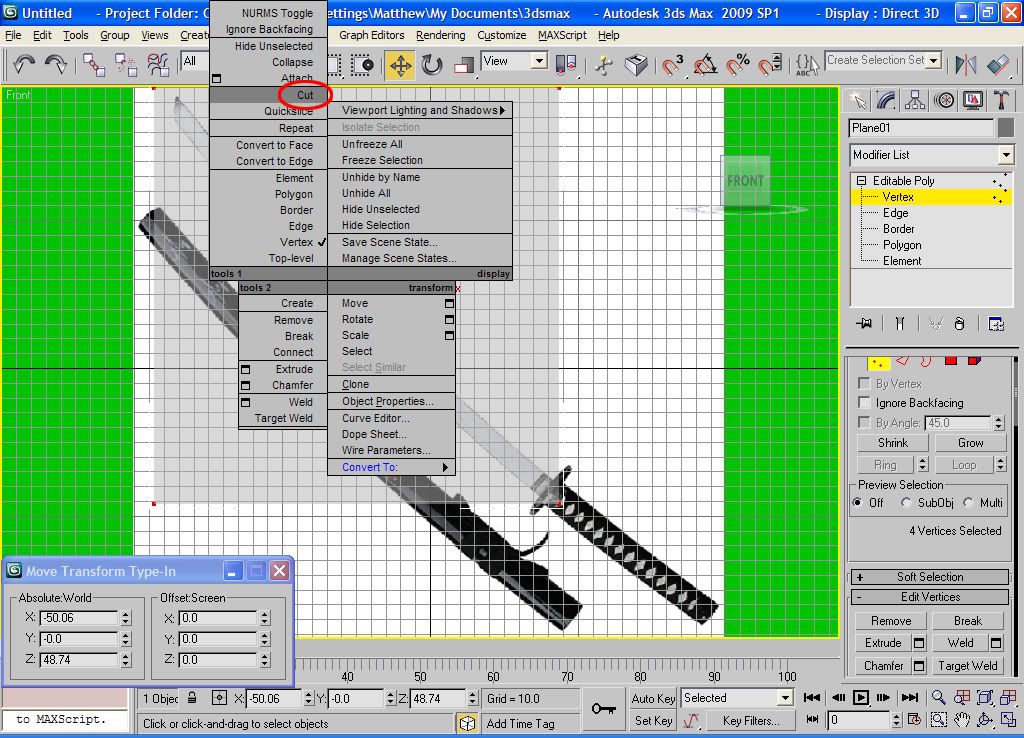
this tool allows us to click anywhere on the object and insert a vert into that area and continue along the edge we want to make:
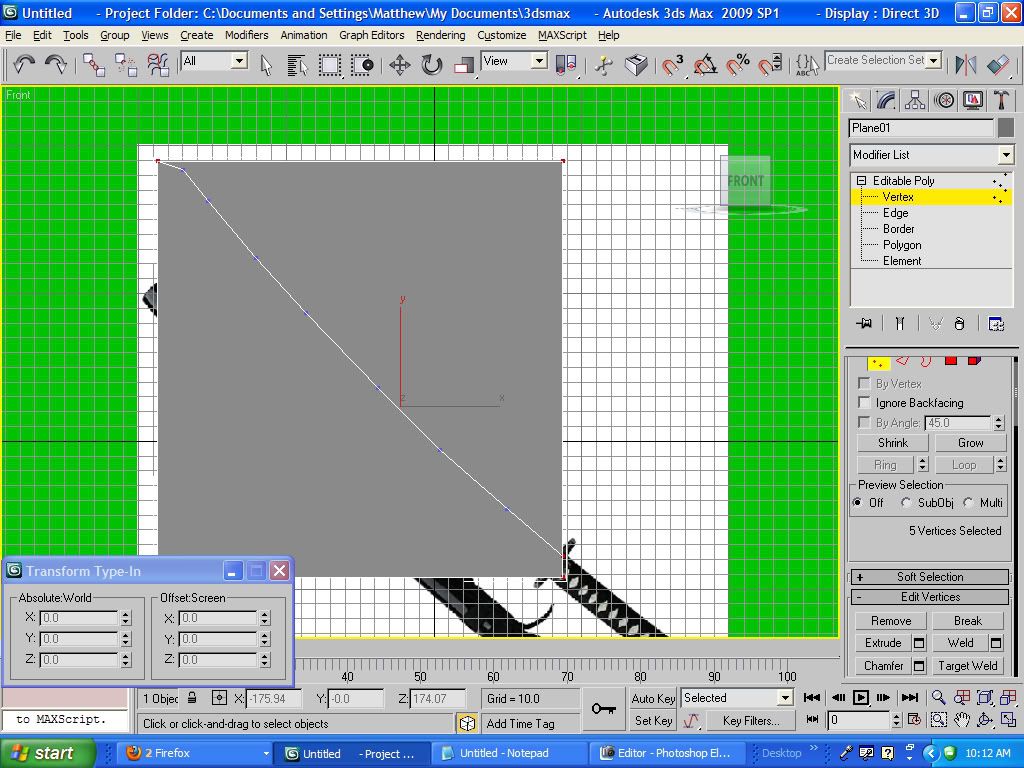
{to get out of this tool just right-click} and just continue cutting out the shape, once that's done click and drag your select tool over the outer verts {hold Ctrl while doing this to select other verts that are out of reach normally} that we don’t want, in my case its the 3 verts that are currently red, then hit Delete:
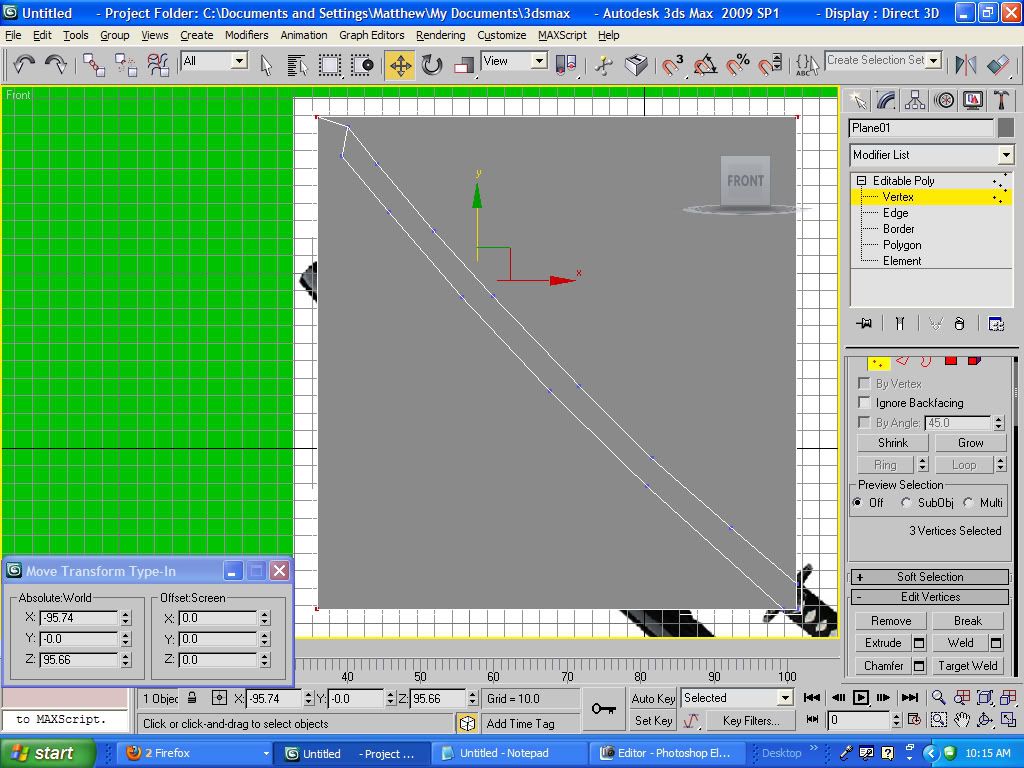
And walla, a not so great looking blade, you can select individual verts that you created and re-position them the way you want to make them fit better. So continue using the cut tool to make the edge beginning of the blade and so on:
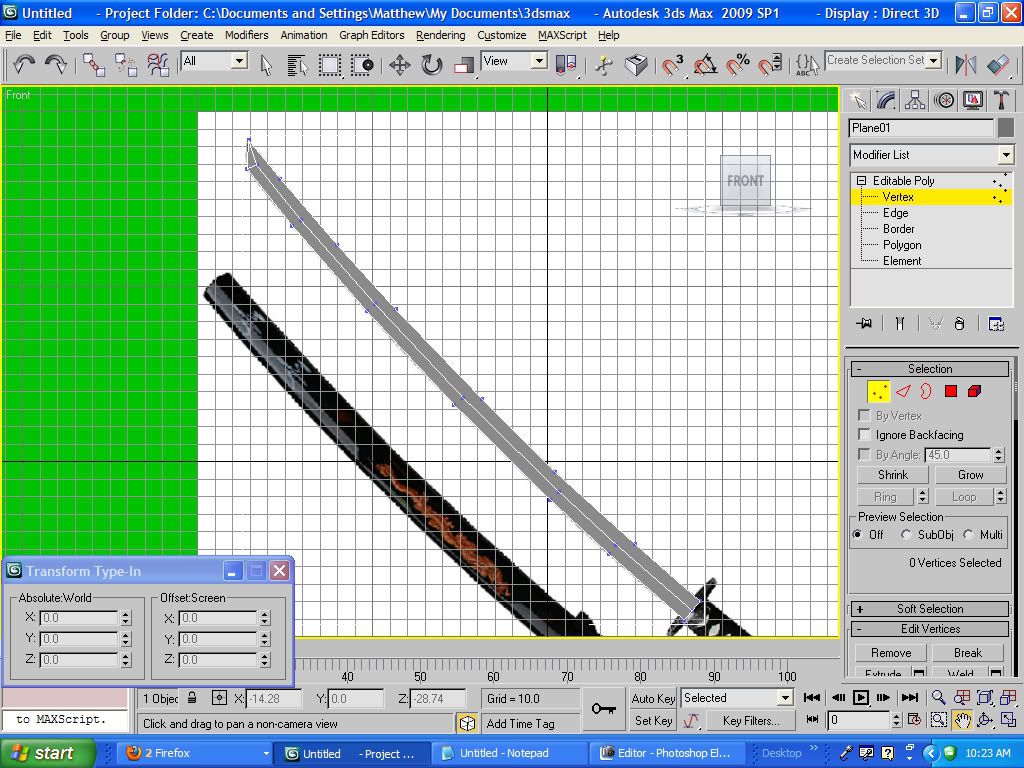
ok, now that our blade is better looking we want to go the poly editing menu:

and then hit Ctrl+A to select all of our blades polys:
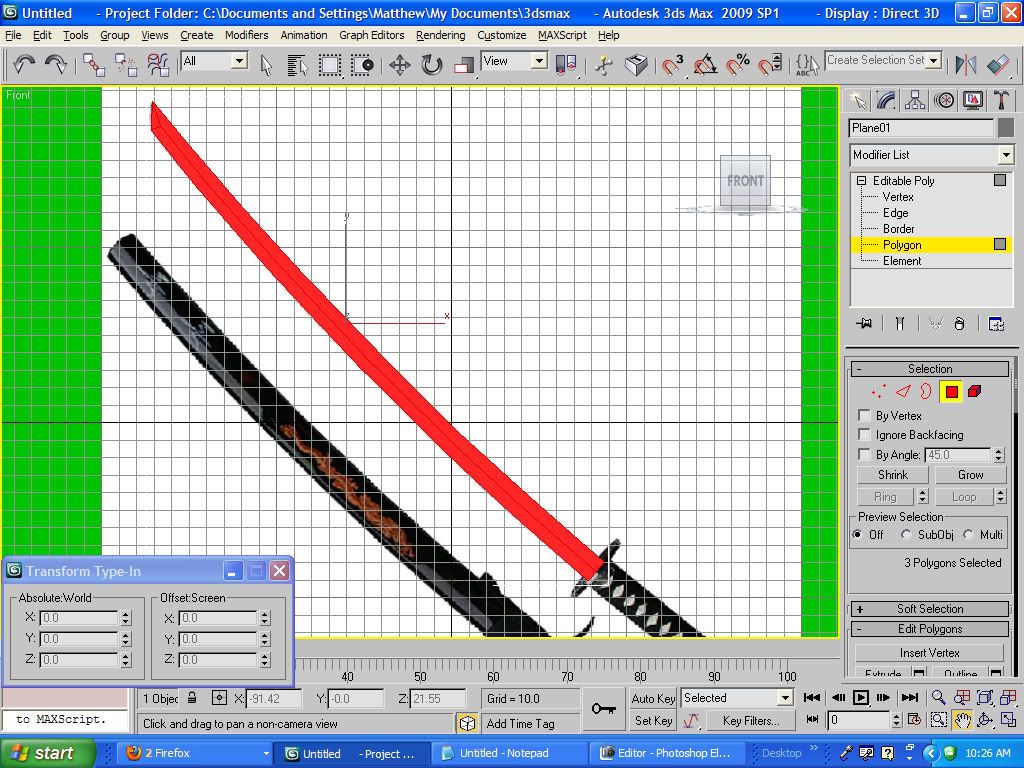
go down the poly editing menu and choose Extrude:

and that will open this dialog box:
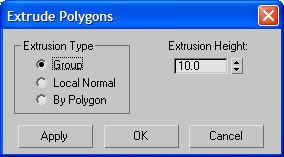
we want to be in Perspective view for this part, the Extrude editor make the polys you select spring forward depending on the number we have entered:
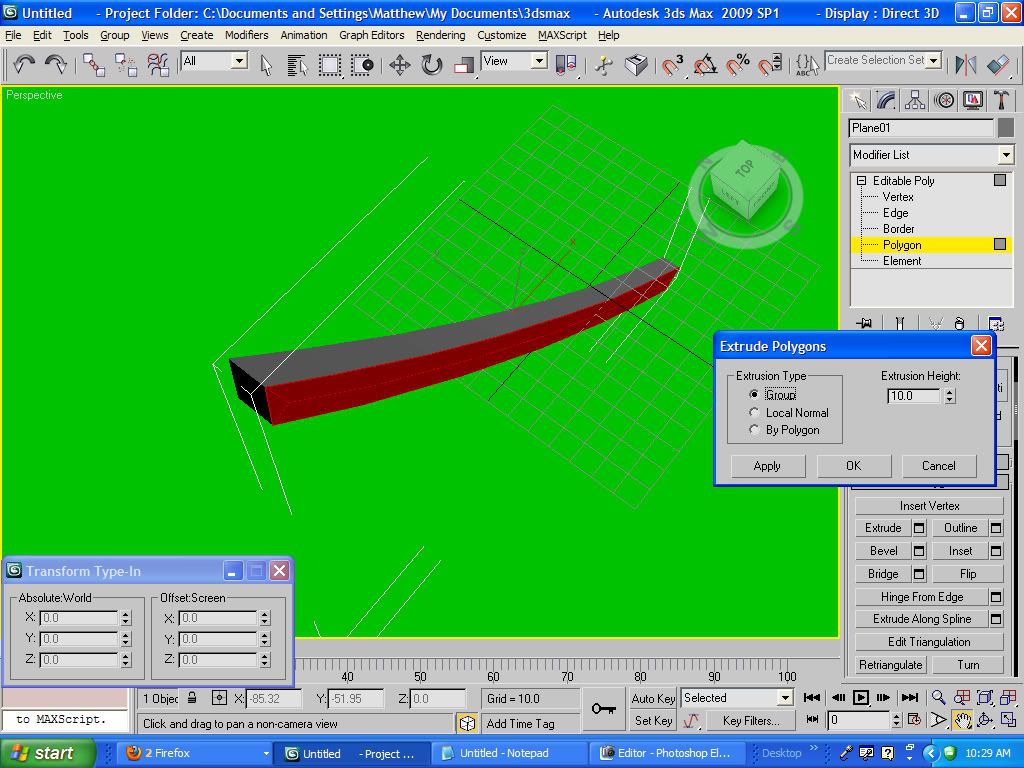
in this case I have 10 entered, but that’s a bit much, so play around with the thickness until you find one you like, in my case 2.0 is just fine:
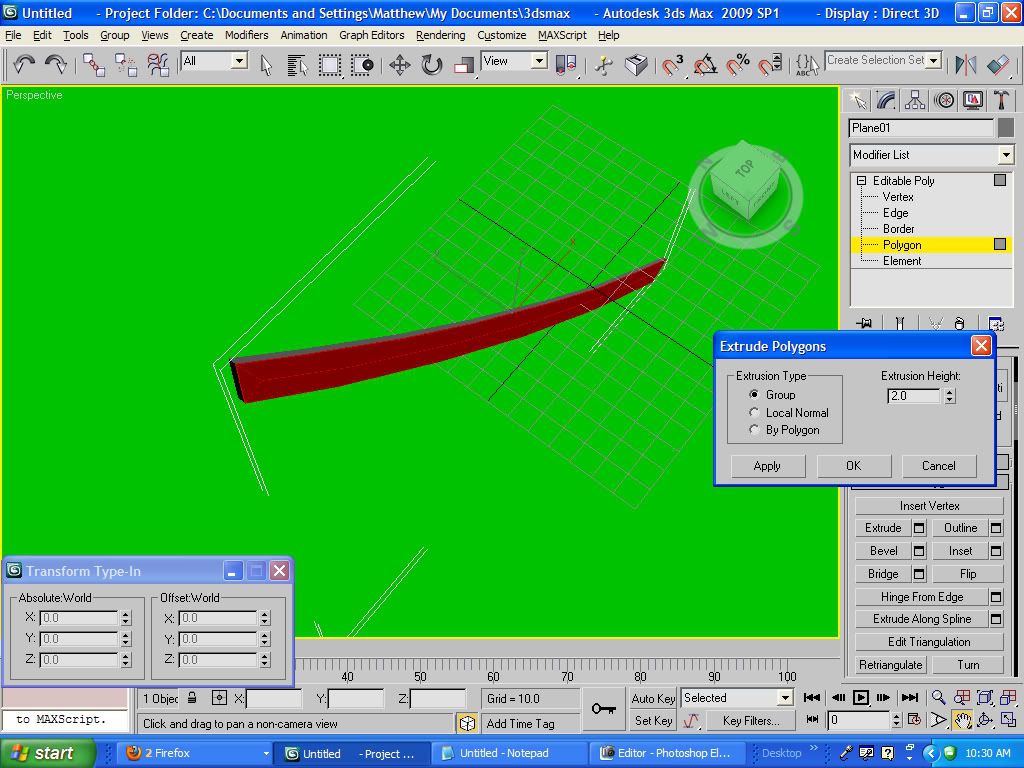
{please note that this is actually half the blade, the other half we will be making soon} once that’s extruded, go back to vertex editing and choose Target Weld.
This tool lets you select 1 vert and then another and the two will be joined together, be prepared to hit Ctrl+Z to fix any mistakes you may make, as separating welded verts is a difficult matter:
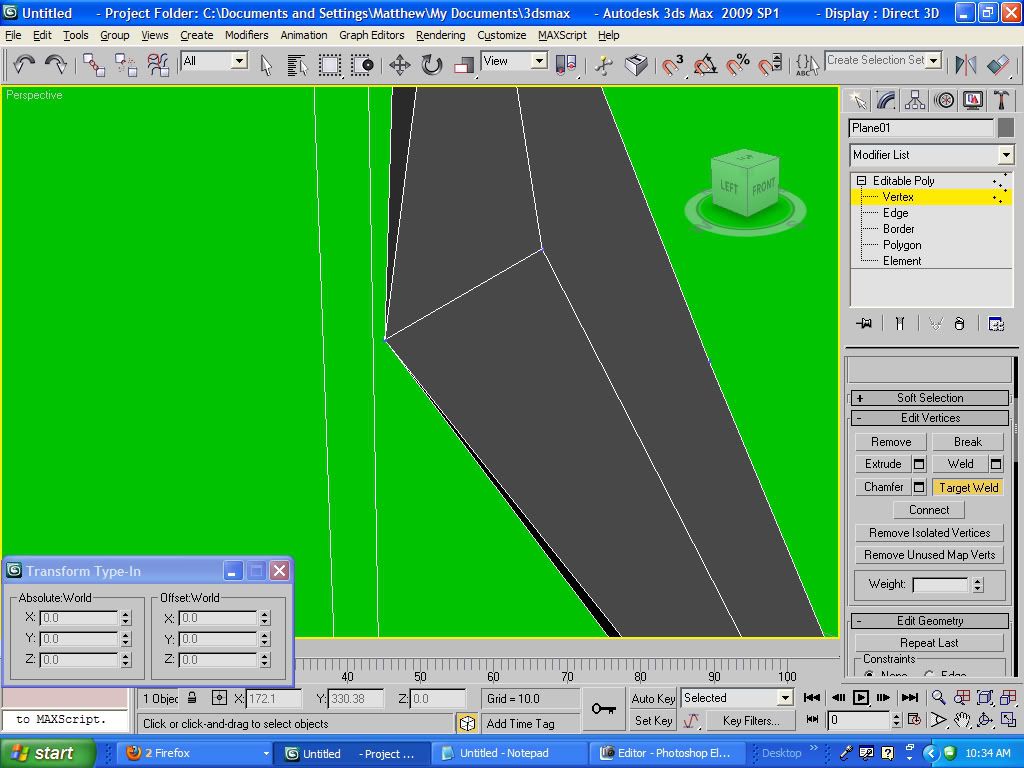
now we want to weld all the verts on the edge side of the blade:
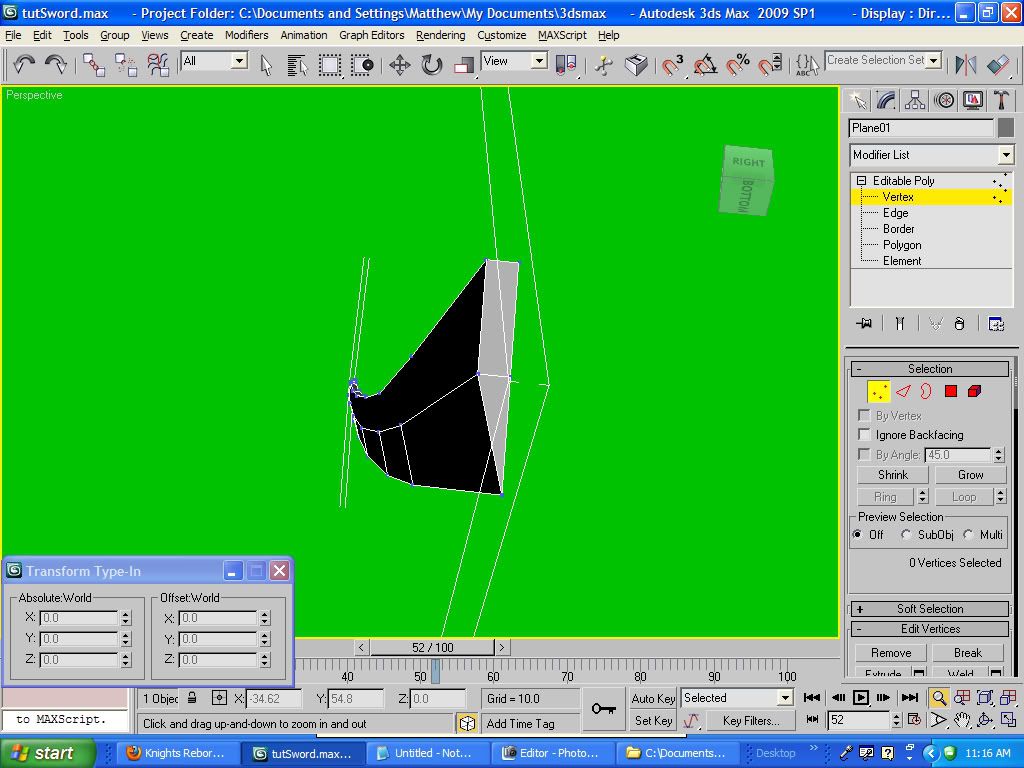
now that our sword has a blade lets make the other half of it, up in the right hand corner is a tool called Mirror:

this comes in handy for making symmetrical models, such as sword blades, hit that button and this box will open:
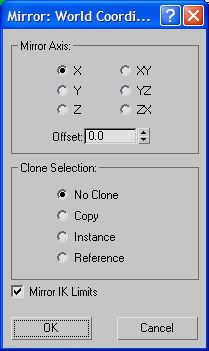
change the Clone Selection options to Copy and the Mirror Axis to Y:

{note: the coordinates depend on how you have your blade setup, you may have to play around to get the desired effect} to get something like this:
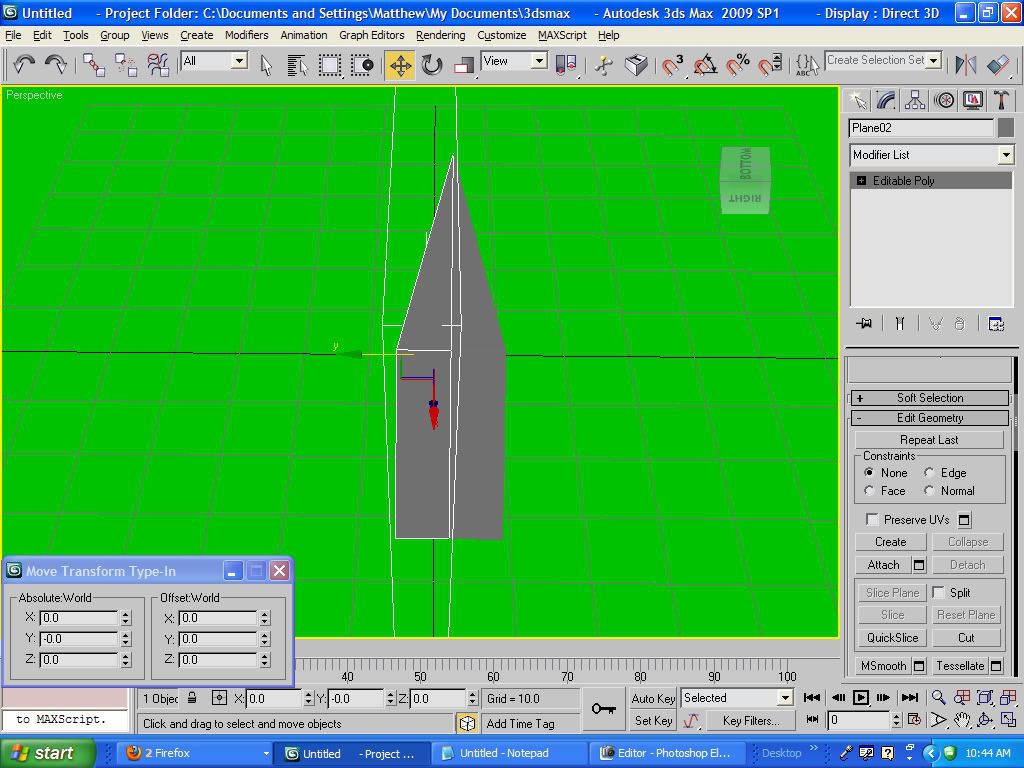
Right-click and choose Attach from the menu that shows up:
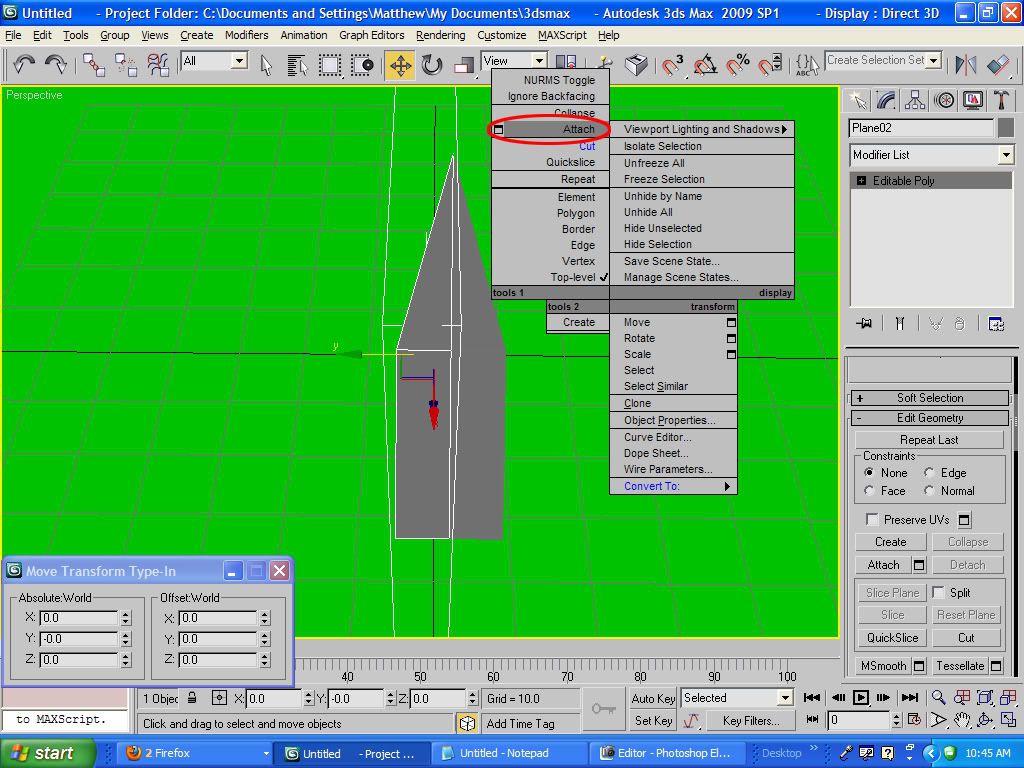
this allows you to combine two objects together, click the other half of the blade you don’t have selected, now the 2 halves are 1, almost, go to vert editing mode and select all verts with Ctrl+A to select all of the verts, then right click and choose Weld:
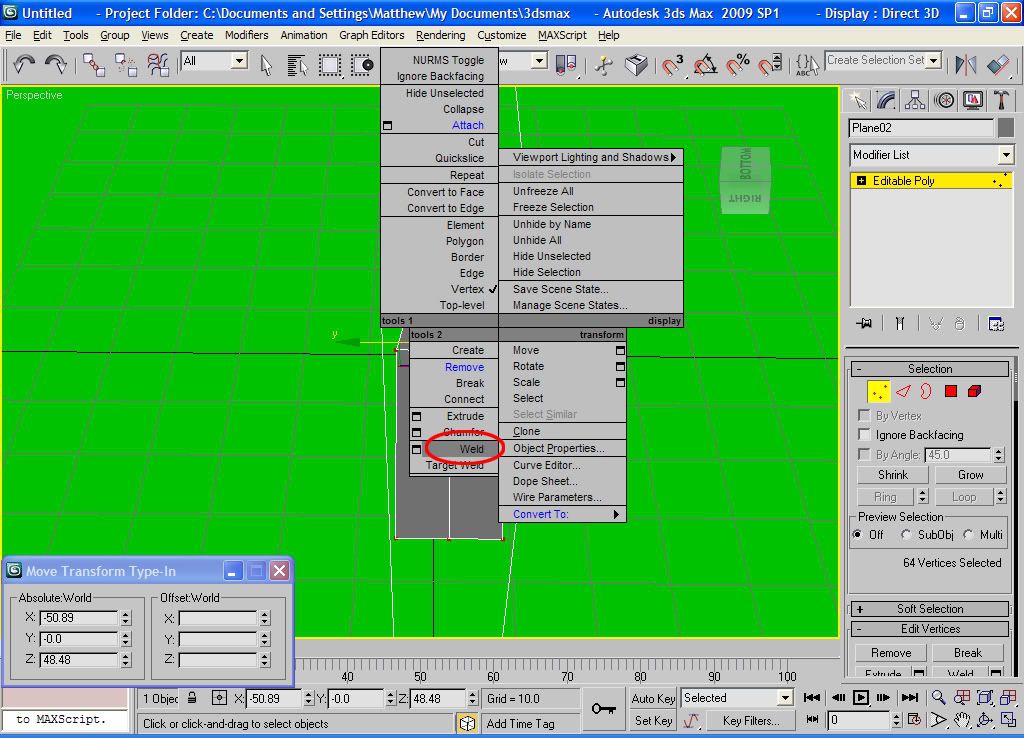
now my vert count went from 64 to 47, that’s because all of the verts that were touching were combined, making it a complete merge. Alright, your blade is now done, next step!
Step 5: Next, we want to make the handle, in my case it's basically a cylinder. so we want to go back to the Create menu and choose Cylinder:
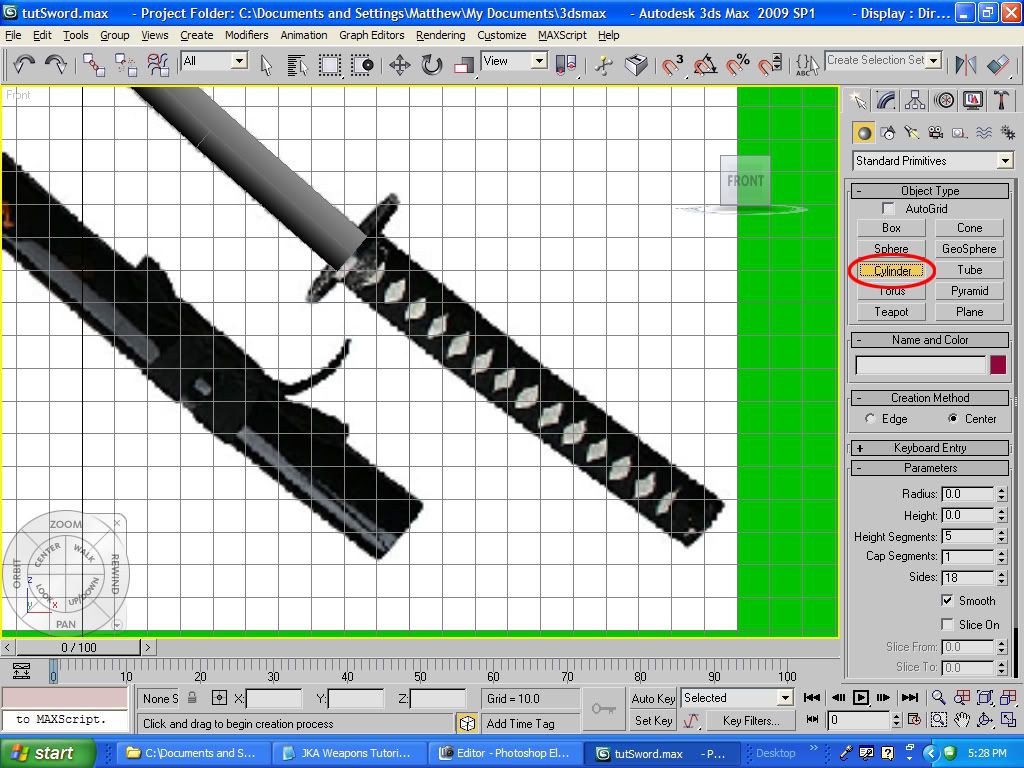
click and drag on the workspace to create the base of the cylinder:
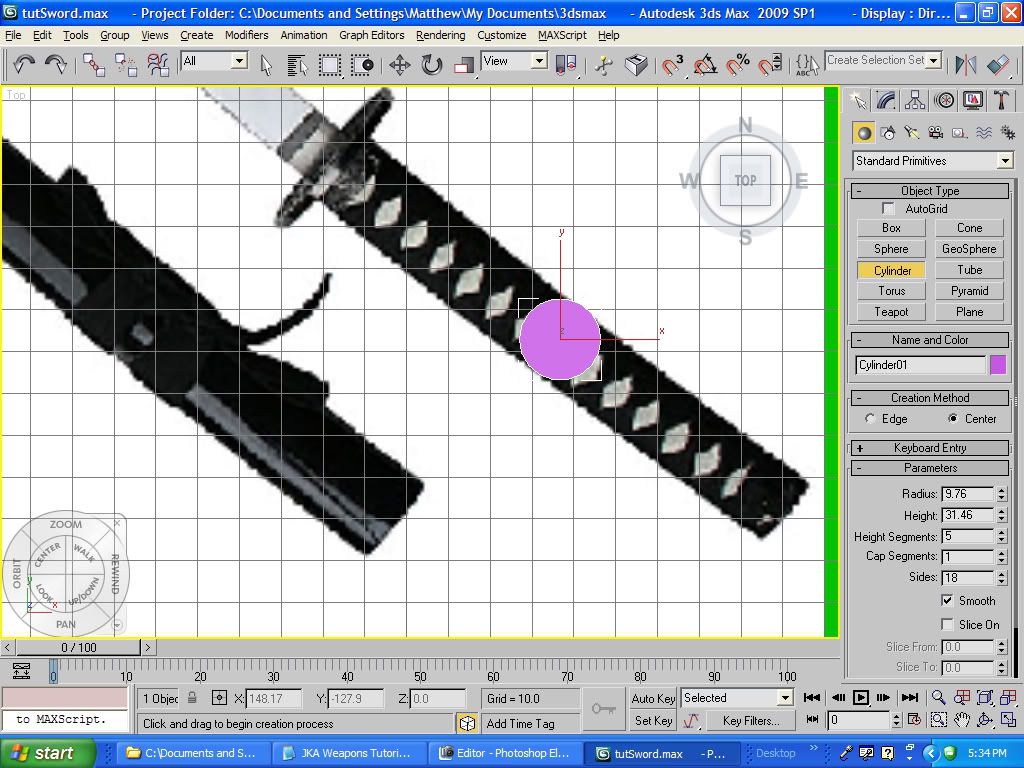
then lift up without holding the mouse, then click again, and be sure to lower the Height Segments to 1 and the sides to 6-8, as anything higher is a waste of polys:
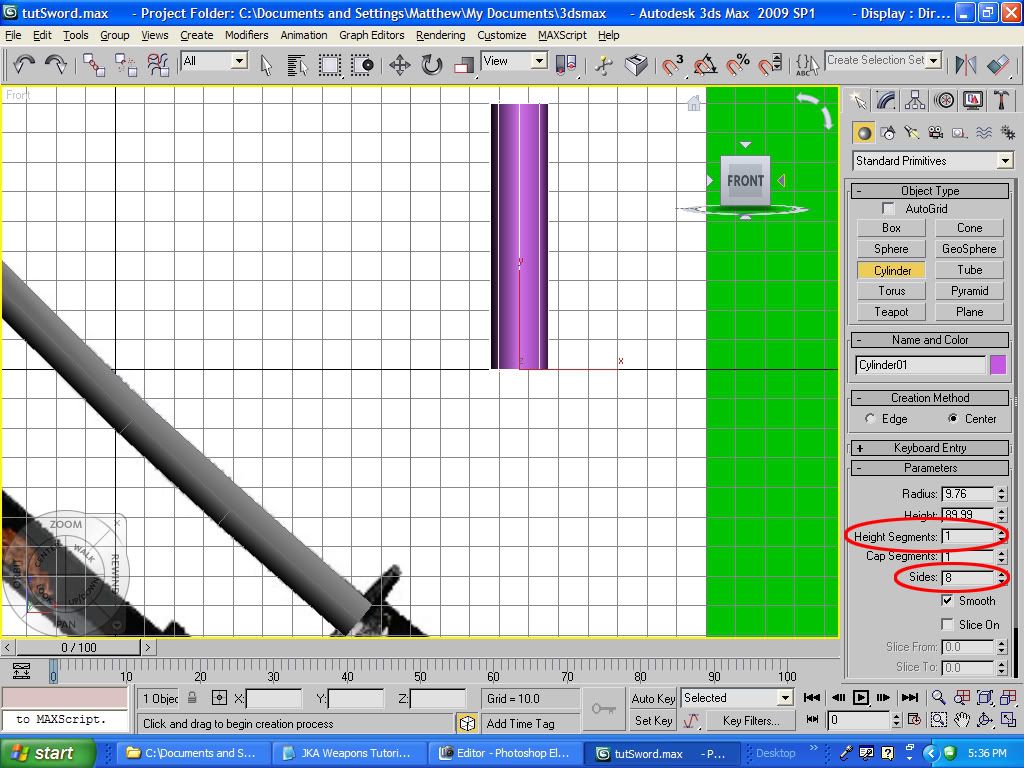
0 out the coordinates and convert to Editable Poly like you did for the blade before:
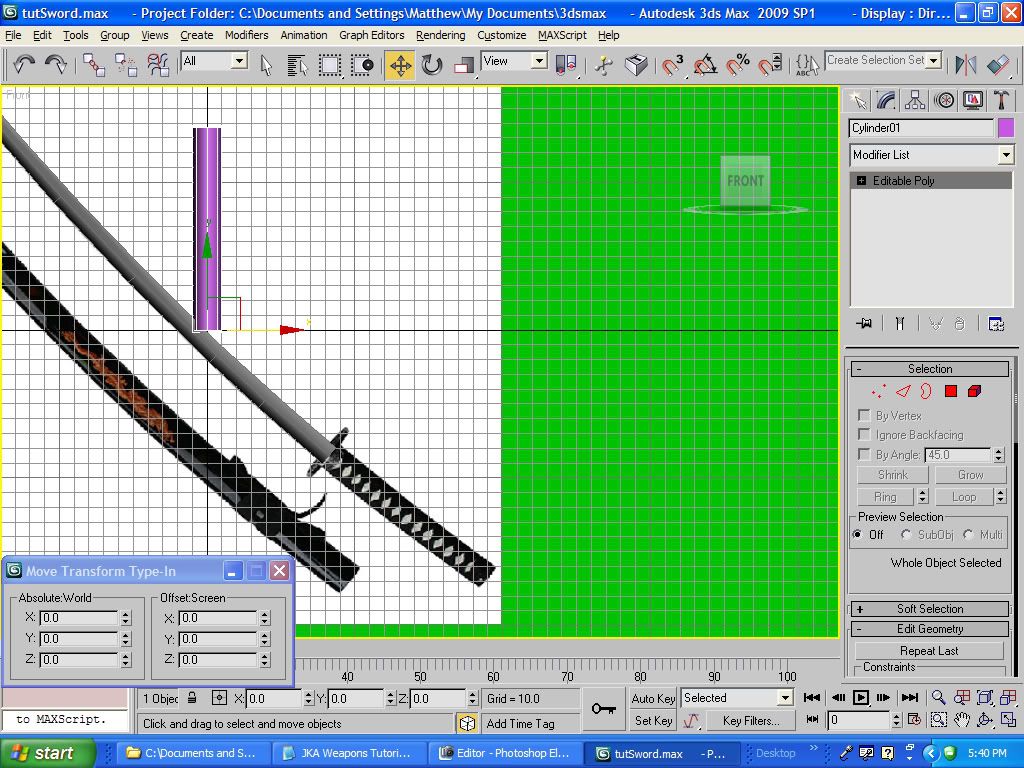
then select all the verts and move/rotate it into place:
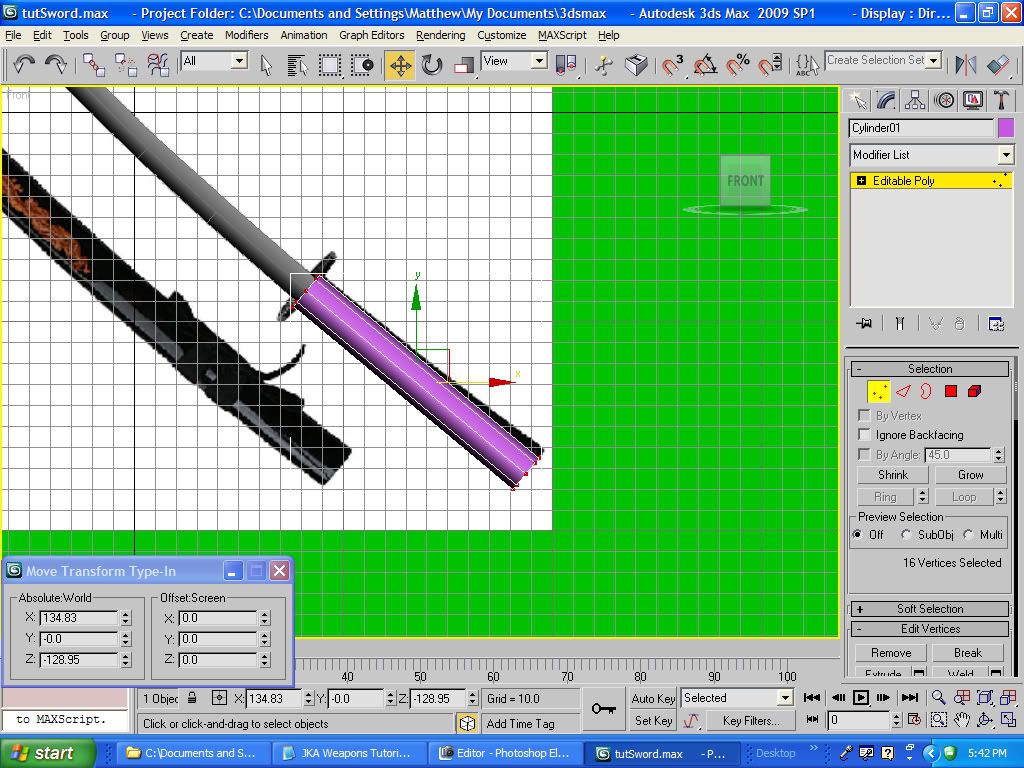
switch over to the Edge editing menu:

and select the edges that make up the sides of the cylinder:
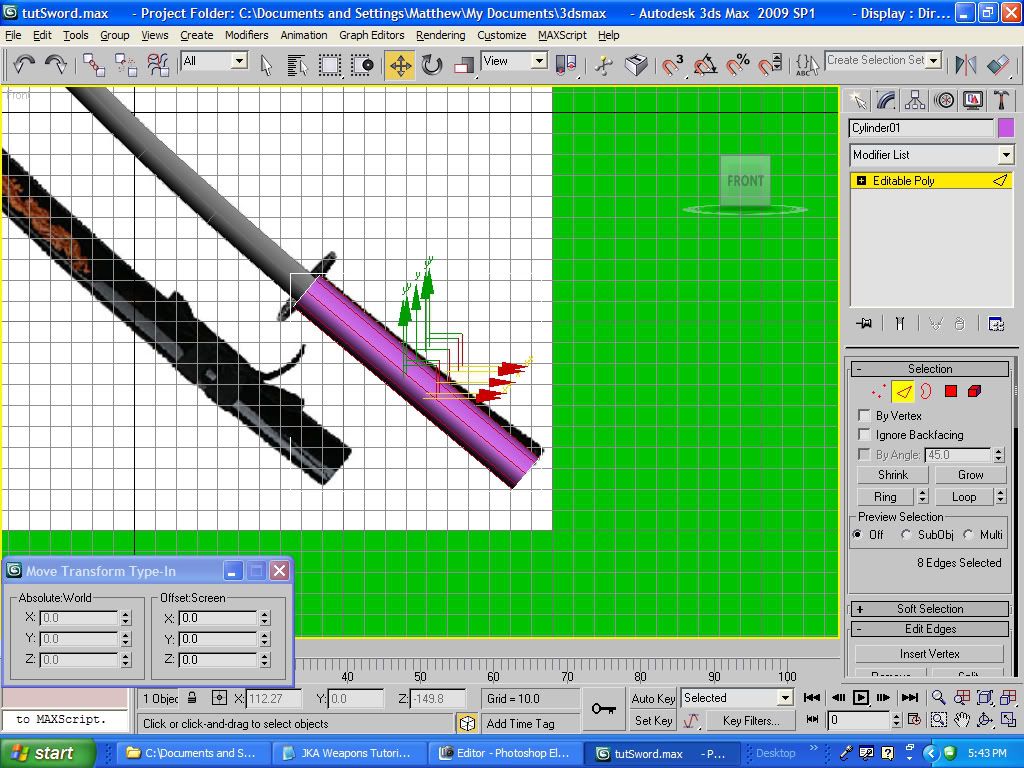
and right-click then choose Connect:
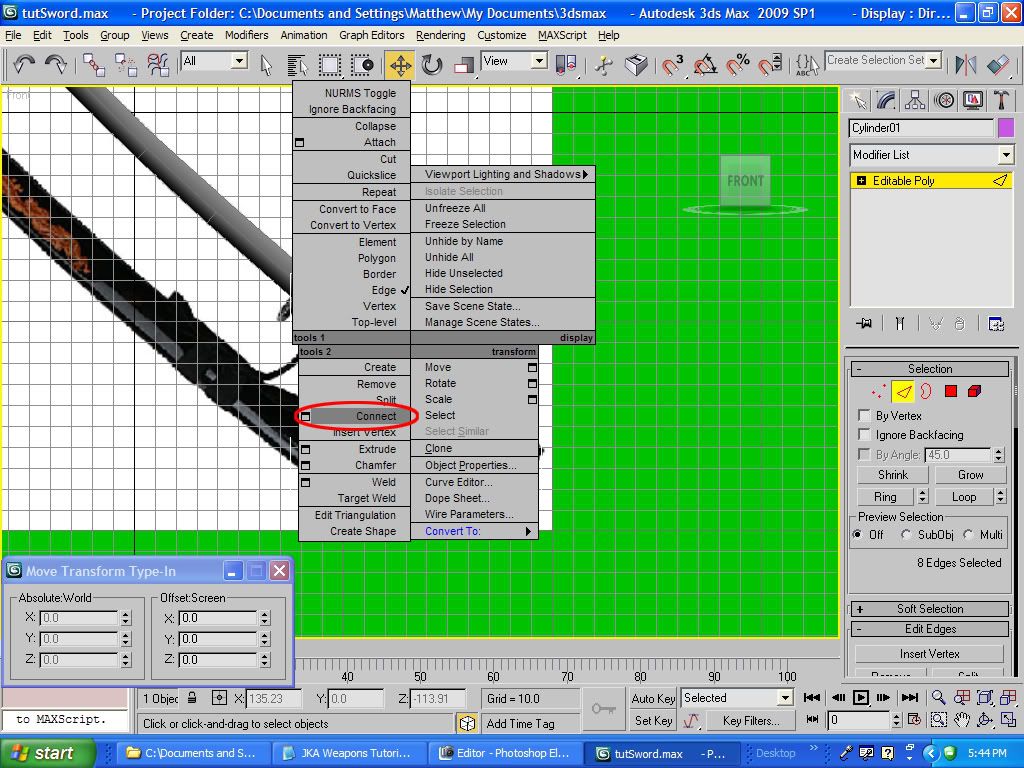
this creates new edges that encircle the edges you had selected:
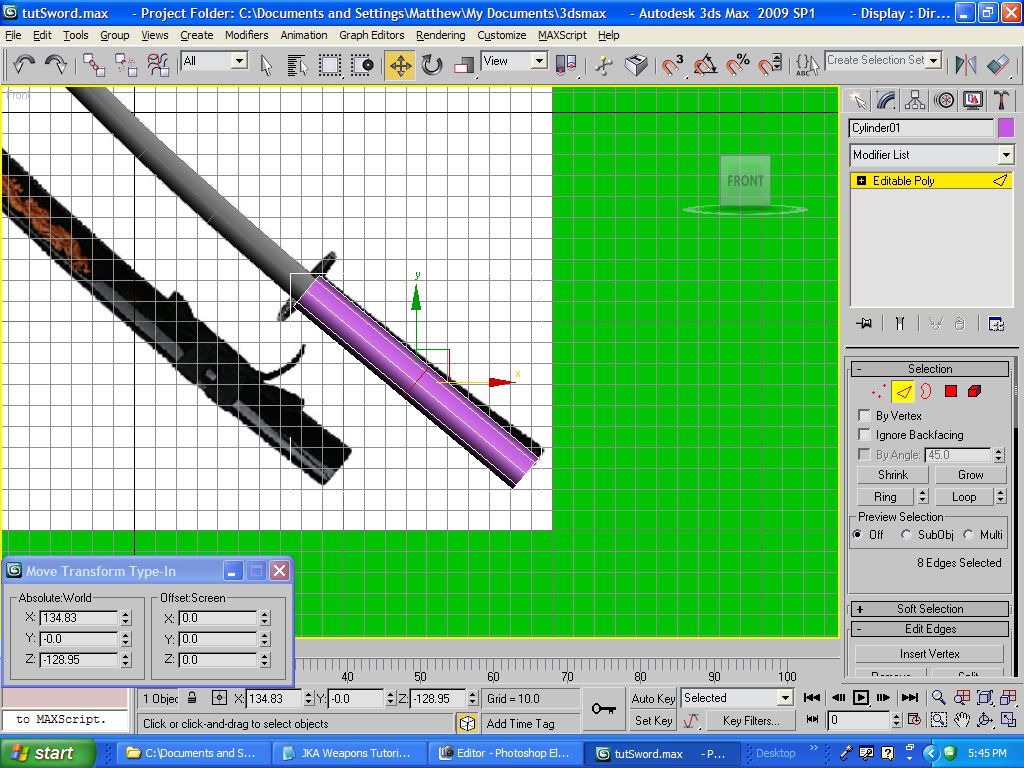
you can use this to edit the handle in ways that make it fit the reference. now that our handle fits the reference it obviously shouldn’t stay circular, so lets go back to verts and select them all and use the Select and Non-uniform Scale tool:
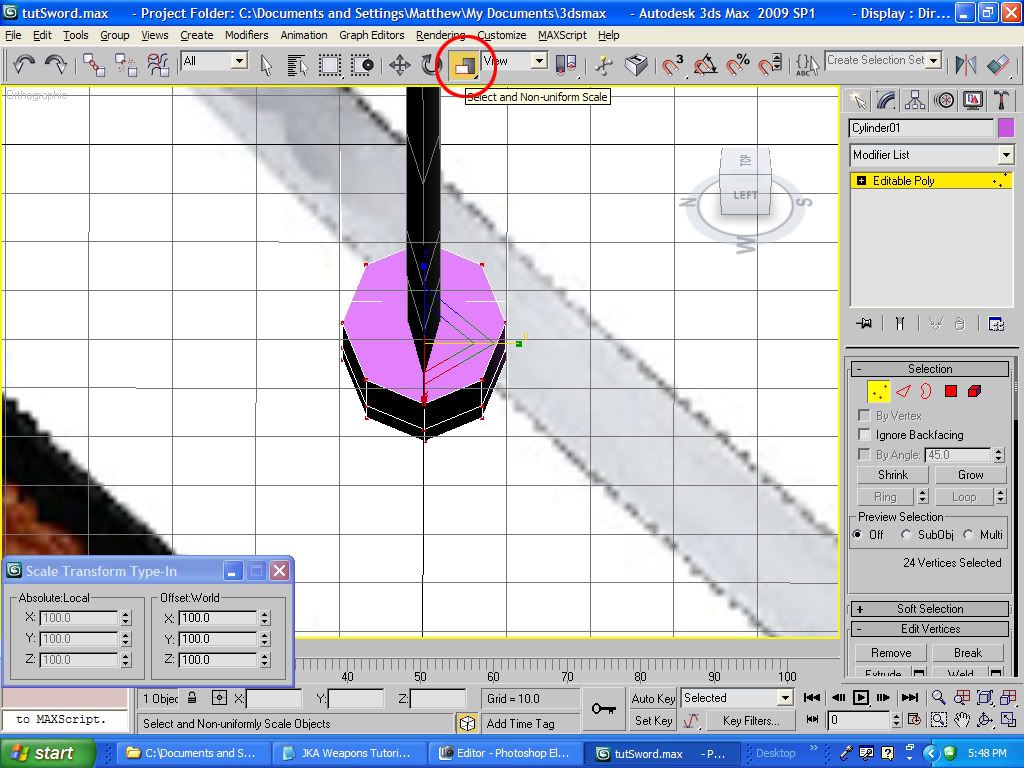
{note, to get the tool click and hold the Uniform Scale tool until all 3 show up, choose the second one} we then want to decrease the Y coordinate to 50% to squash the cylinder:
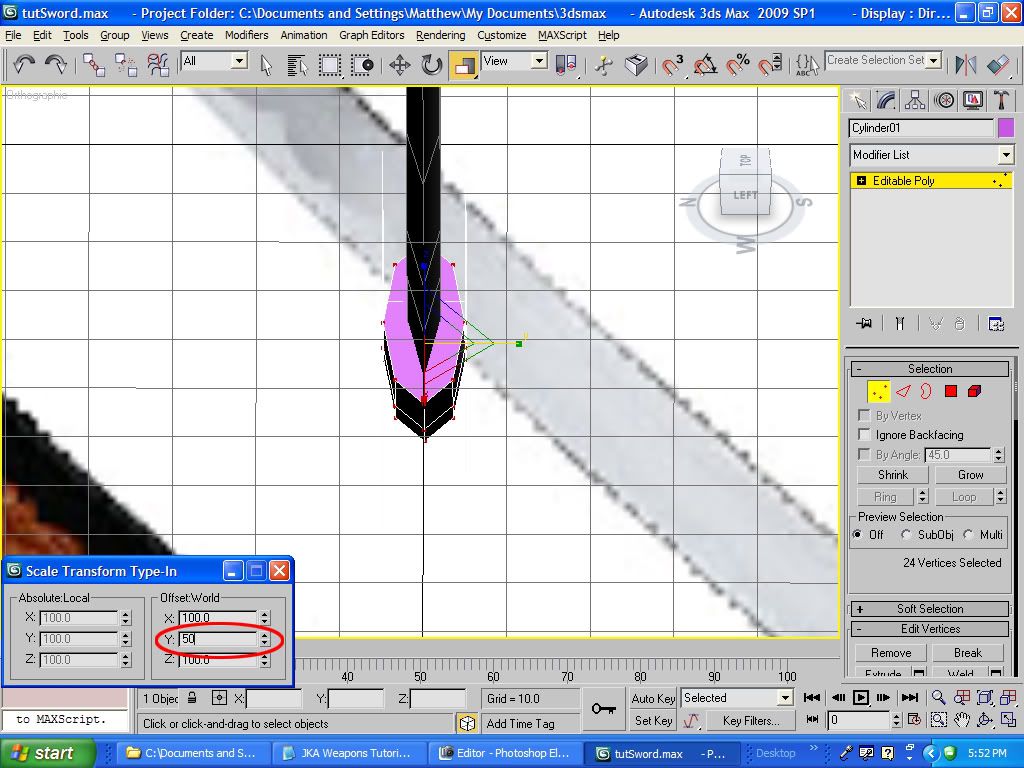
that’s just about right for my handle. Ok the handle is done for now, we don’t have to bother with the pommel {in my case I just made multiple Edge connections and scaled them to round them off}:
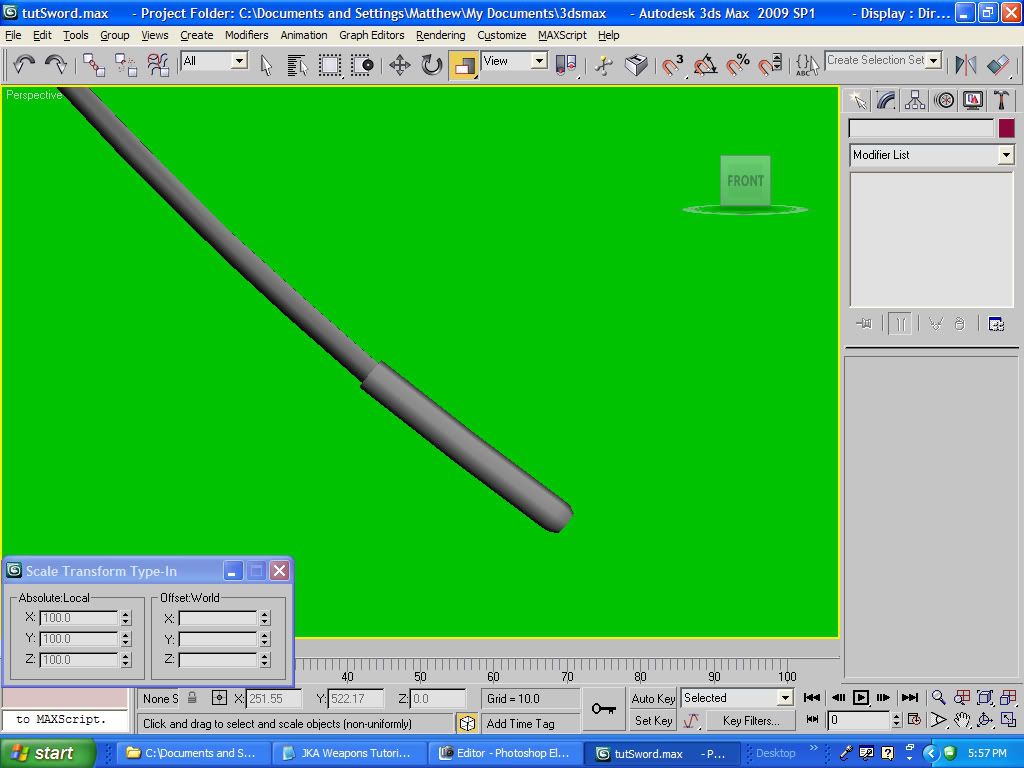
Step 6: now we want to make the handle guard, or tsuba. in my case its just a flat cylinder, so ill start by making that, mine has 6 sides, 20.75 Radius, 3.0 Height and 1 Height segment:
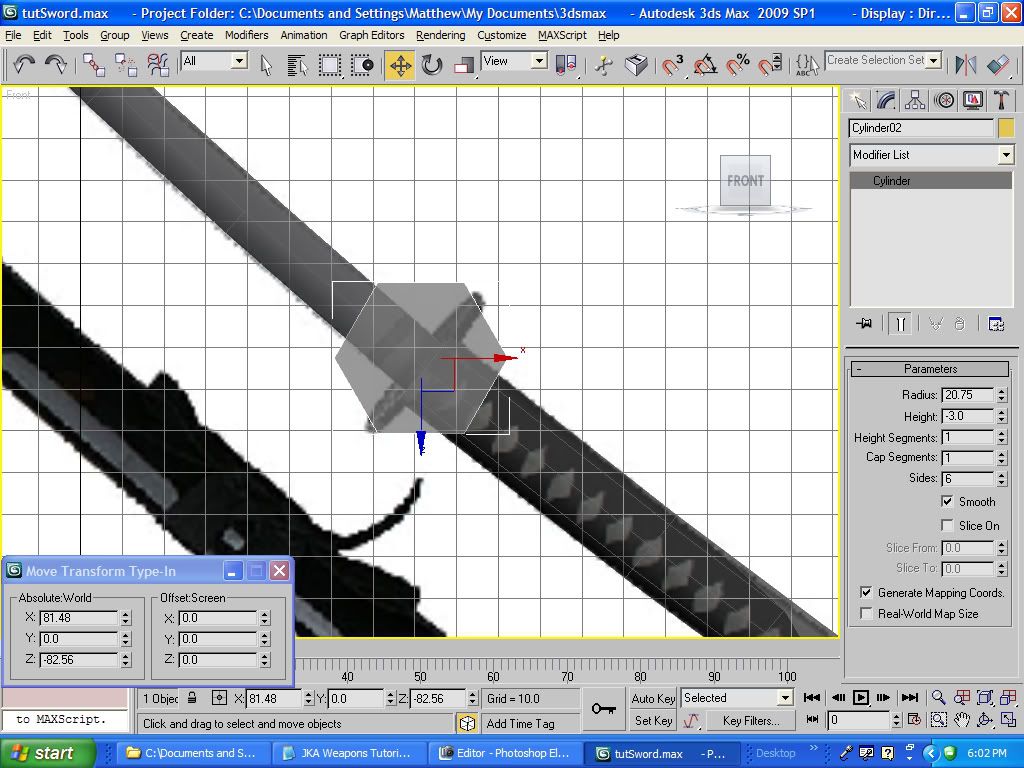
now 0 it out and all that other good stuff, and go to the Polygon selection menu and select the top and bottom polys:
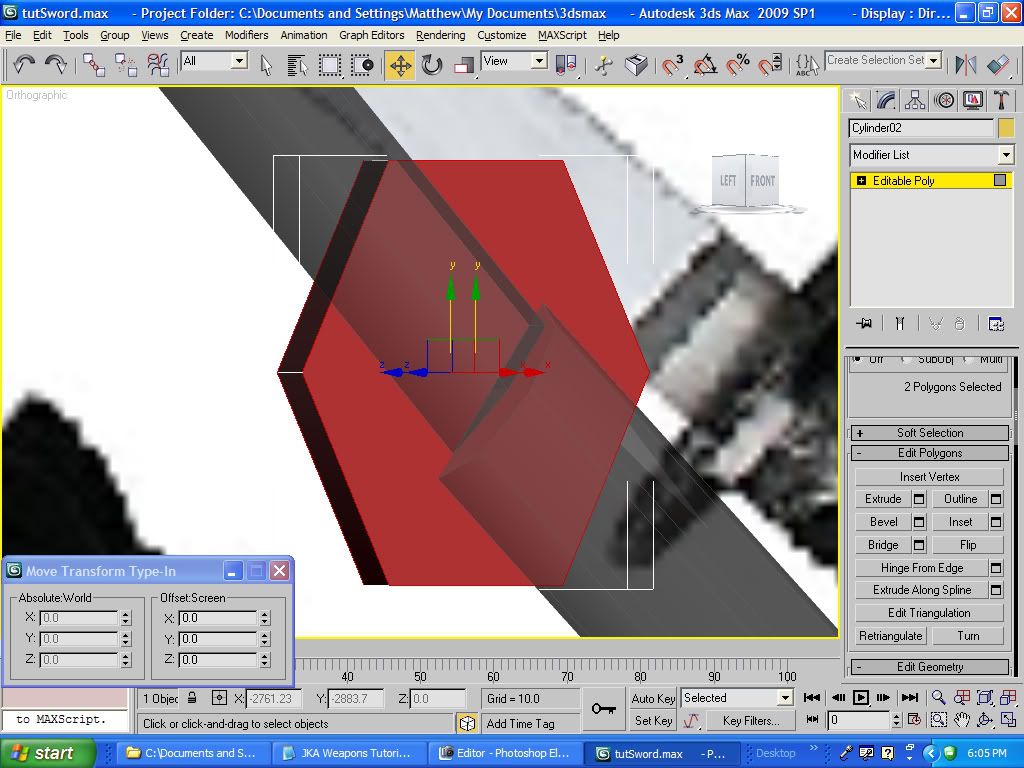
next go down the list of options and choose Inset to open this box:
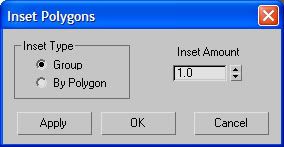
Inset creates more edges inside of the selected polys:
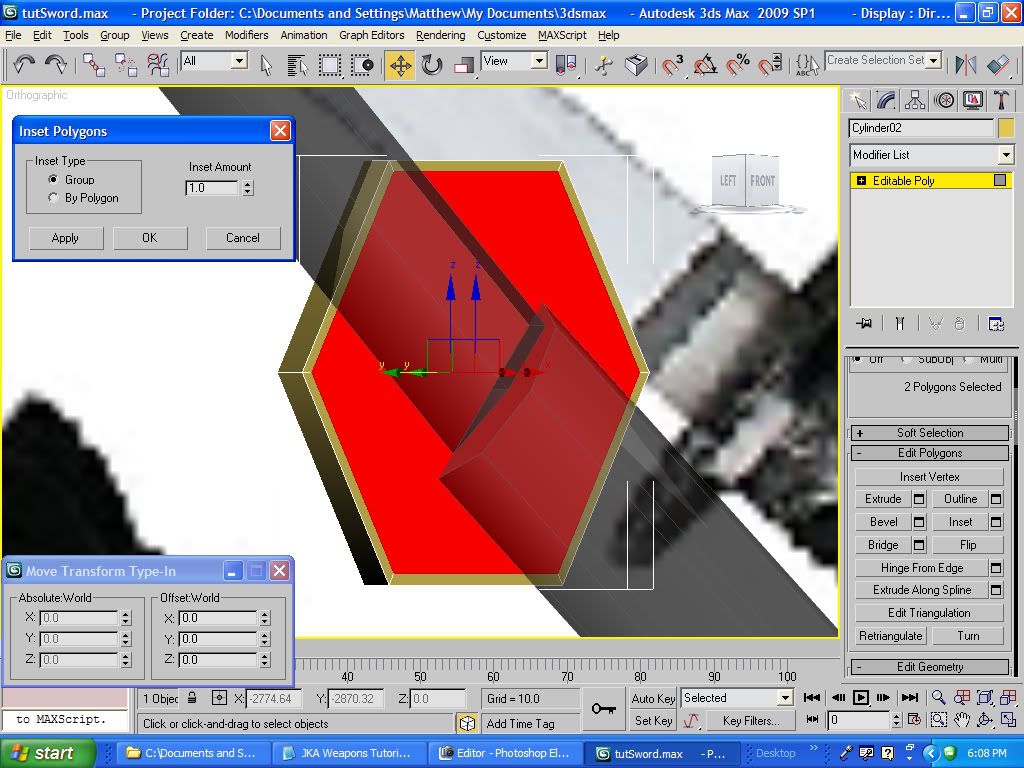
in my case Inset Amount of 1.0 is a bit too little, so we will go with 3.0:
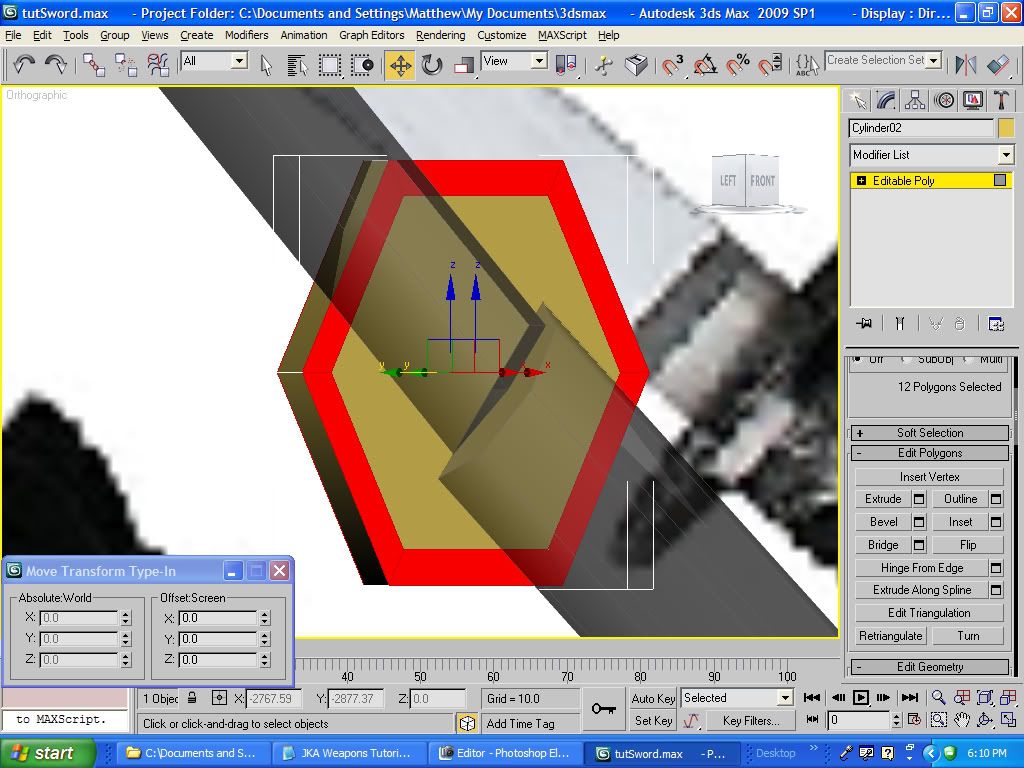
next we want to select the new polys that were created just now and choose the Extrude option to open this box:
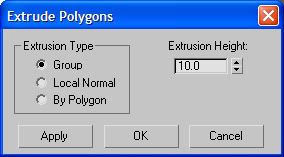
In my case 10 is way too much so lets go with 1.5. And we get this:
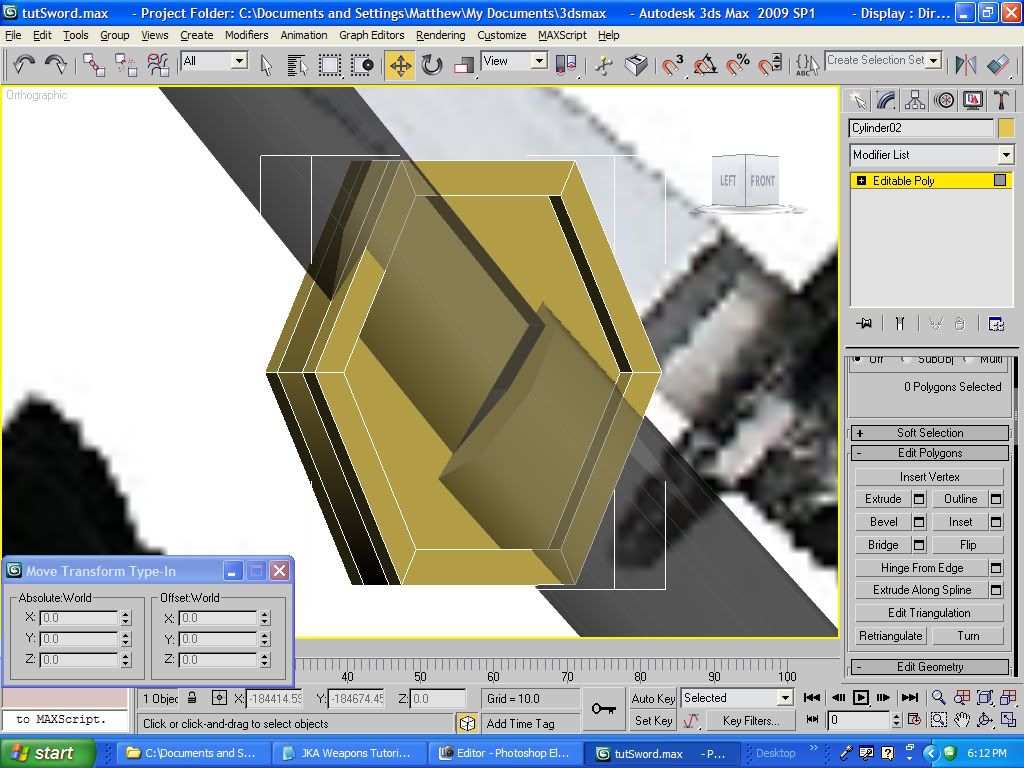
so now we want to Rotate and position our tsuba correctly:
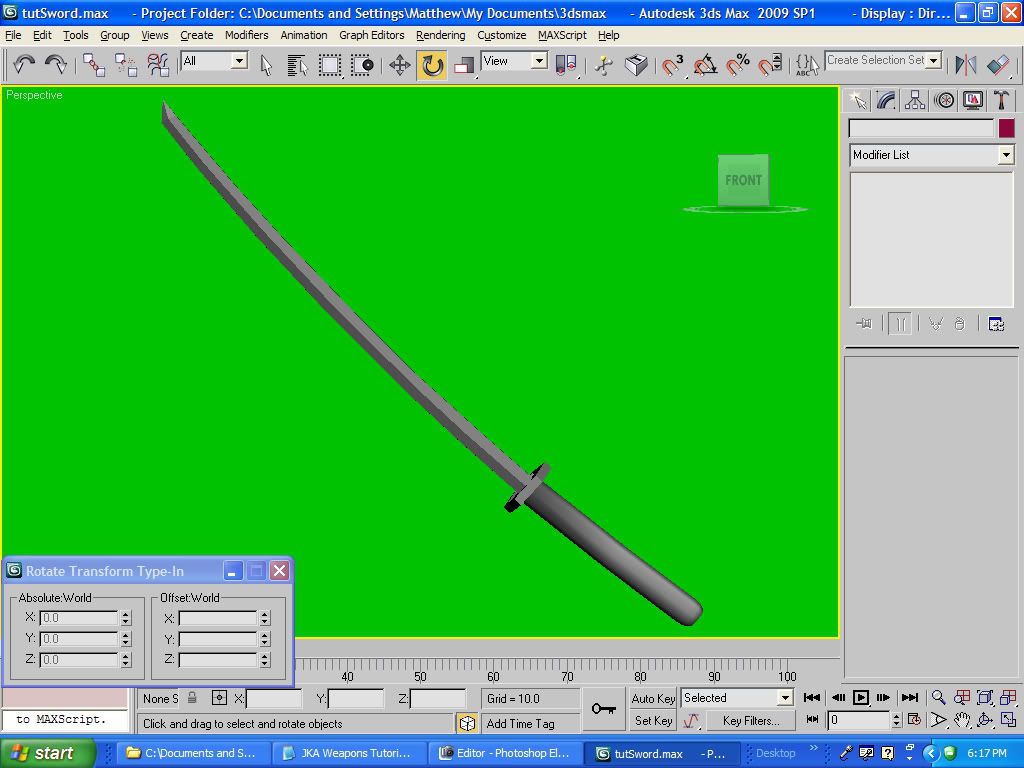
Ok the sword is all done and the entirety of the model has only 151 Verts and 132 Polys, it’s a pretty low-key model and should run smoothly
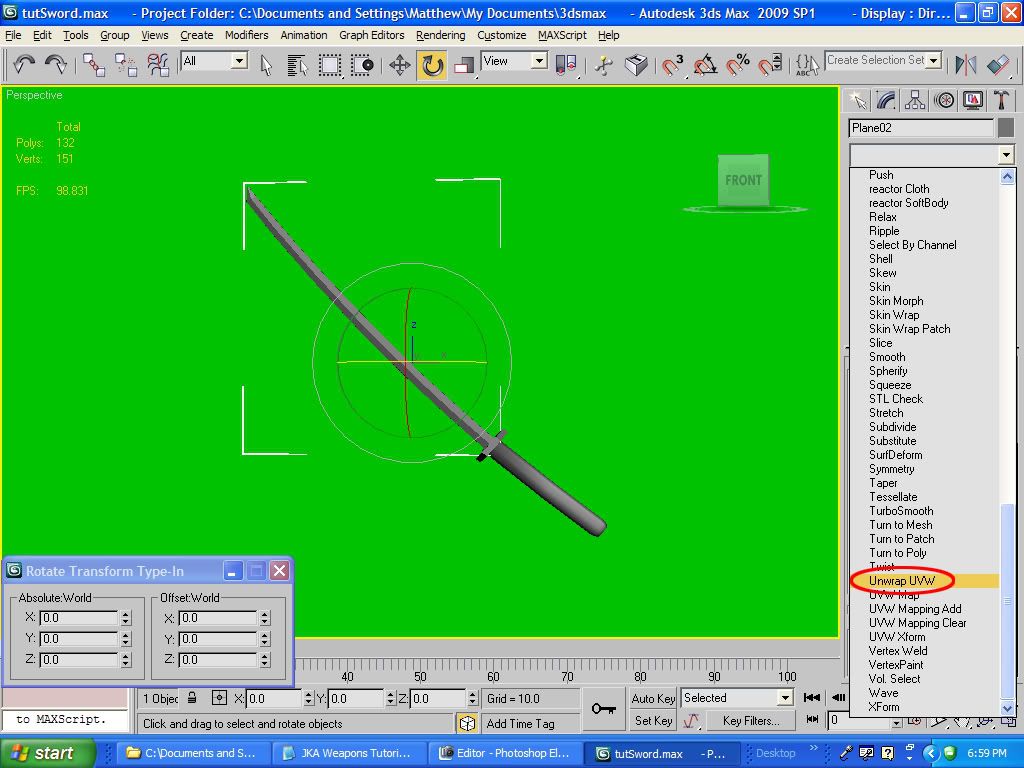
Step 7: alright next is one of the hard parts, UV Mapping. What is UV Mapping? It’s a process a model goes through to determine how textures lay on its surface. UVs are a series of dots and lines that are the framework of a model, similar to the edges and verts. so first what we want to do is select each piece of our model and apply an Unwrap UV Modifier, this is found in the little Drop-down Menu called Modifier List {its alphabetical so it shouldn't be hard to find}:
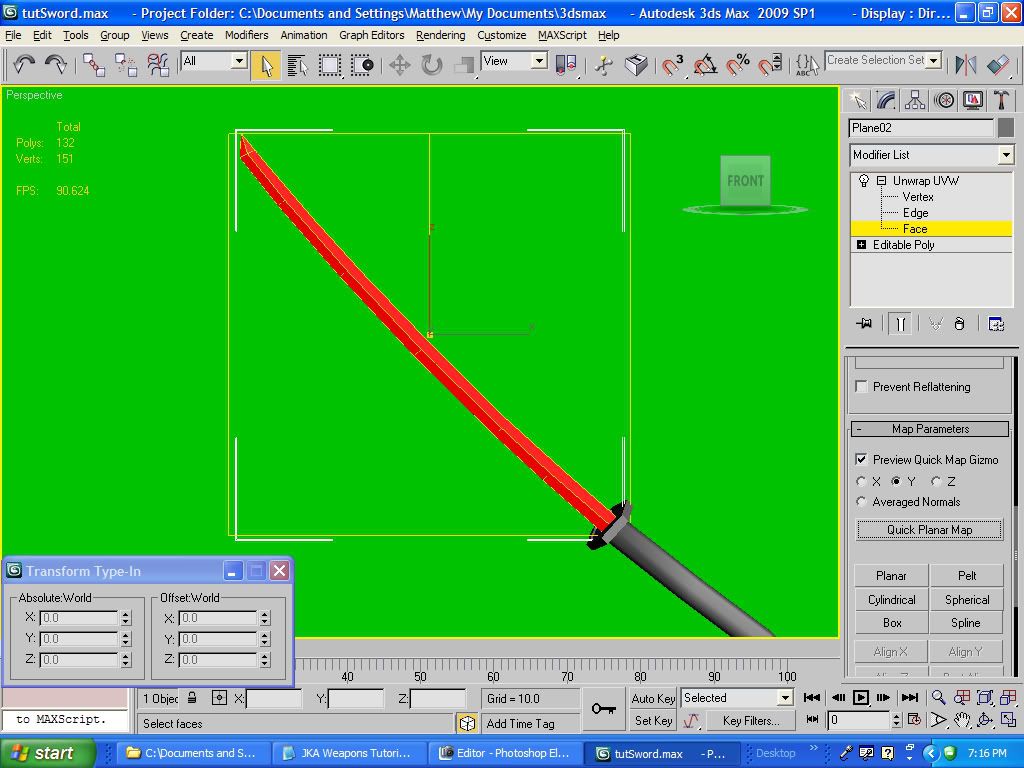
select the Face Selection option in the Unwrap UV menu and hit Ctrl+A to select all the polys, the model will be highlighted in red and have various yellow lines all around. now go down the list of settings and under Map Parameters click the Y bubble and click the Quick Planar Map:
now we go up and choose Edit... in Parameters, that will open this window:
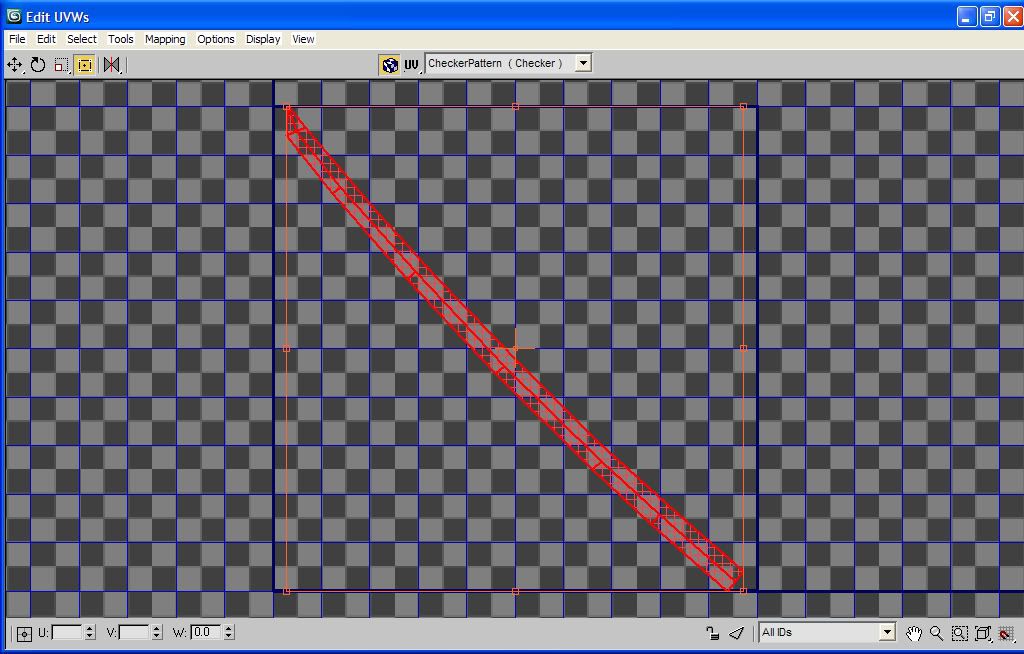
this window is the UV Editing Window, here you can switch between vert, edge and face selection so shape your UVs to the way you want them to be laid out, for the blade of the sword of course you want to make it symmetrical so the main faces need to lay on top o each other. and we also want to get the faces on the back of the blade separated so that they don’t look bad, to do this we select them all normally and then Planar using X and use the Quick Planar button from earlier:
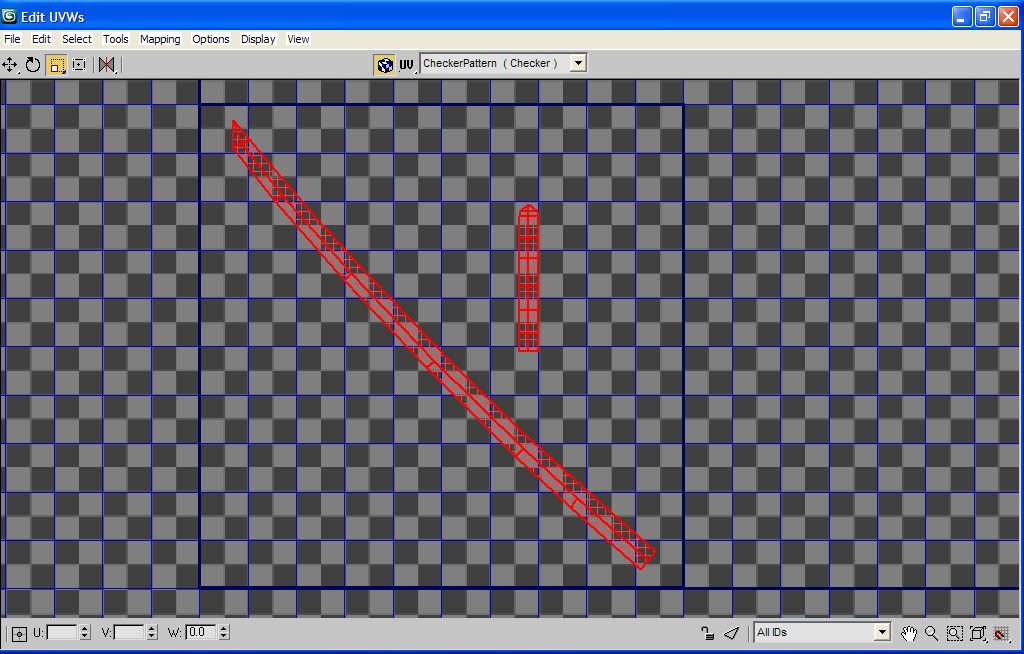
after the UVs have been placed the way you want go up to the Tools Menu of the UV Editor and choose Render UVW Template..., this will open another box, when that box opens you want to hit the Render UV Template button to open this window:
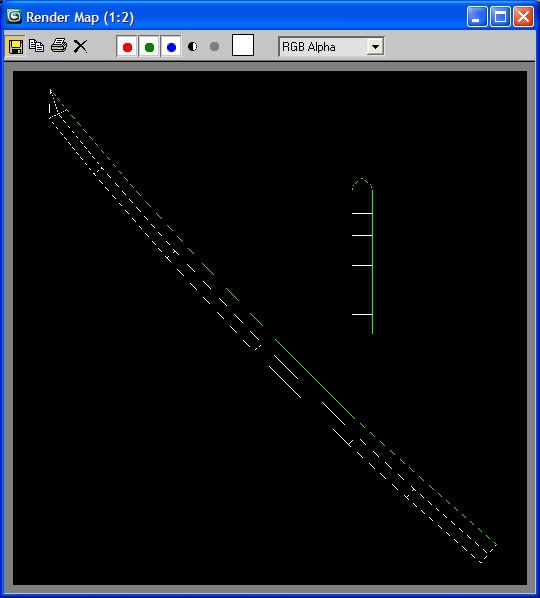
then you want to hit the save button {looks like a floppy disk} and save it as a .bmp in this directory: Desktop\base\models\weapons2\tutSword {or w/e you chose to name your weapons folder, yes it IS important to save it there} {please note that this image is automatically saved as 512x512 dimensions}. so just repeat this step until you have all the UVs made, if you are patient enough you can even combine all the UVs together as one image, but that’s a tad difficult already and this tutorial is waaaaay too long as it is XD
Step 8: now we take care of the basic textures, nothing fancy just a quick mock-up in Photoshop, or whatever imaging software you use {we can worry about the fancy stuff in Modview}. ok so we have the textures setup to be added to the model, so what we want to do is hit the M button on our keyboard, that opens the Material Editor:
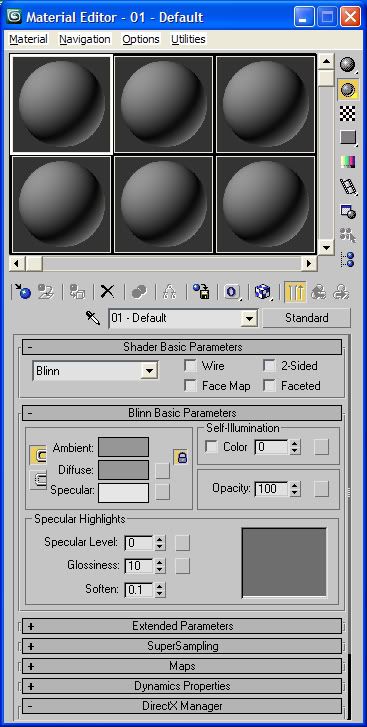
this is what determines the basic textures on our model, so what we want to do is go down to the Maps menu and click on the button labeled None on the Diffuse Color line, this will open another window, here we want to double-click Bitmap, this'll open another window where we can open our .psd files, so select them from where you saved them. now you want to click and drag the new materials you opened over to their corresponding pieces {be sure to also click the little button that is a blue and white checkered cube}:
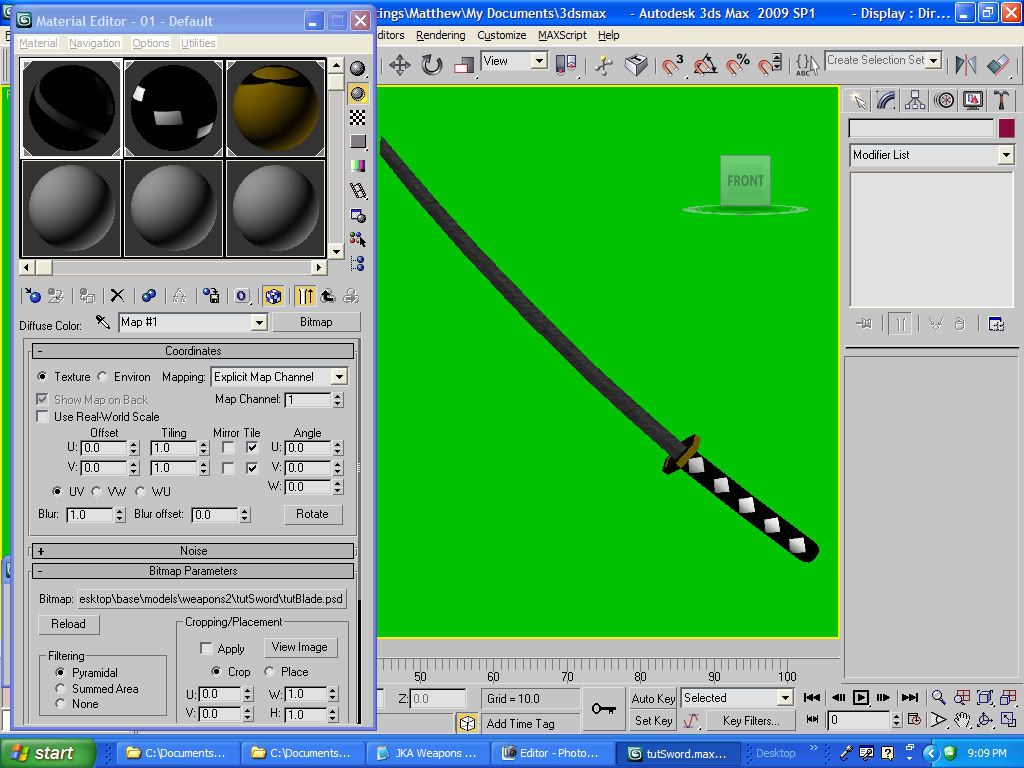
now we just want to select all the pieces of the model and go up to the Group menu and click Group, then hit OK. There, now our model is all together and we can now complete the next step.
Step 9: ok, now we want to go to the Utilities Menu {it looks like a little hammer} and hit the MAXScript button. In the Utilities drop-down menu choose Quake3 MD3 Import. then scroll down a bit more and click the Load all bubble under Tags, then hit the Import MD3... button, now while that loading window is open go run Pakscape and go to your C:\Program Files\LucasArts\Star Wars Jedi Knight Jedi Academy\GameData\base folder, and open the assets1.pk3, now go to the models/weapons2 folder in Pakscape. You want to copy the saber folder and past it in the same location in that Base folder on our desktop. now go back to 3DS Max and go through the folder locations till you get to the Saber folder you just pasted into our base/models/weapons2 folder, select the file called saber_w.md3:
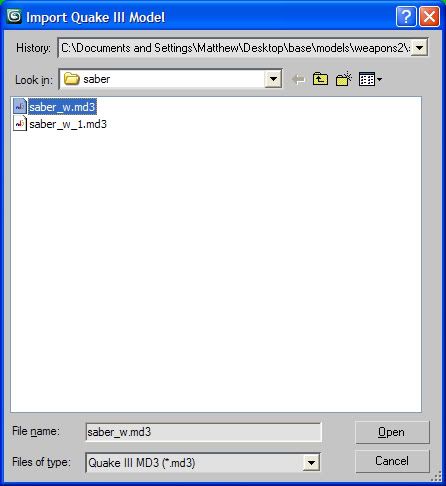
this will open a small Katarn hilt with 2 triangles on it in your weapons space {although most likely you cant see it as most of the times the model you make is waaaaay too big so we will have to shrink it down} so now we scale the whole weapon we made to make the handle of the weapon roughly fit the saber hilts' size. I bet you're wondering what the little triangles are, well these are called tags, they are used by the game to determine where certain things go; saber blades, where the hilt goes in the users hand, ect.... so we have 2 tags: tag_parent and tag_blade1 {FYI the number is used by the game as well, as there are weapons in the game that have more than one blade the number determines which blade is assigned to that place more on that issue later} so we want to highlight the Katarn saber pieces, excluding the tags and delete them so that only the tags remain, and they are nicely placed on our weapon where we want them:
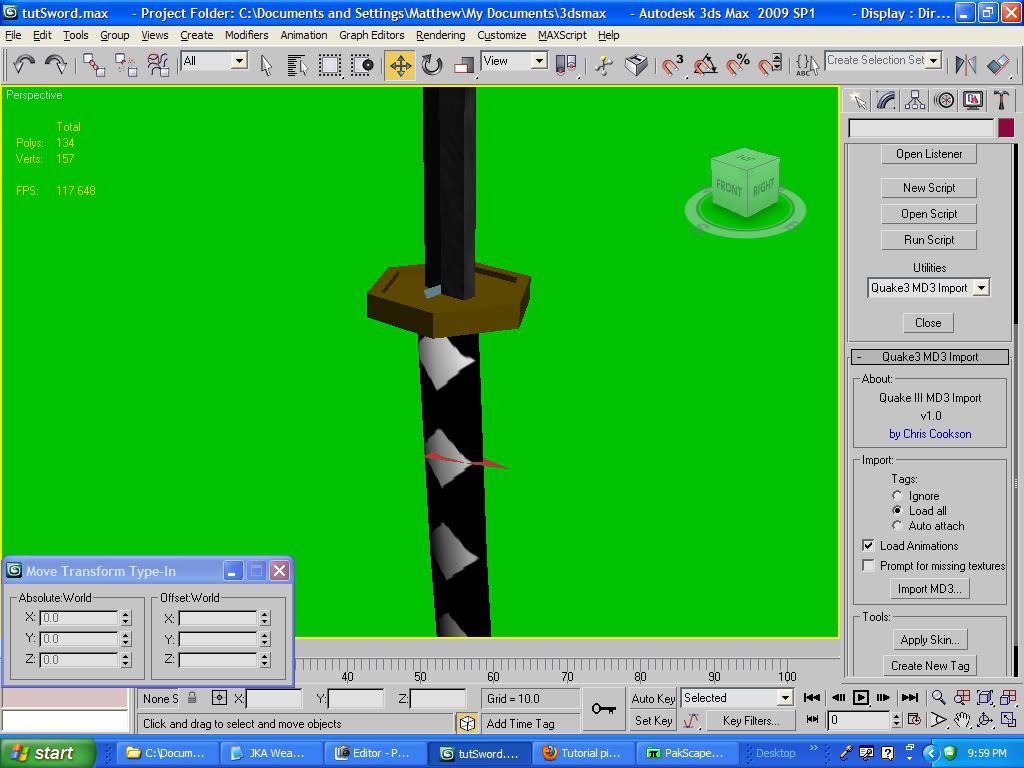
alright so now our weapon is scaled and tagged next we want to go to File/Export, and we want to export it as a .3DS file type and instead of our default location we want to save it in the same folder as its images {be sure to maintain names here, its very important to keep it simple}.
Step 10: ok now that we have our .3DS we can close 3DS Max and open Milkshape 1.8.2, once it is running we go up to File>Import>Autodesk 3DS:
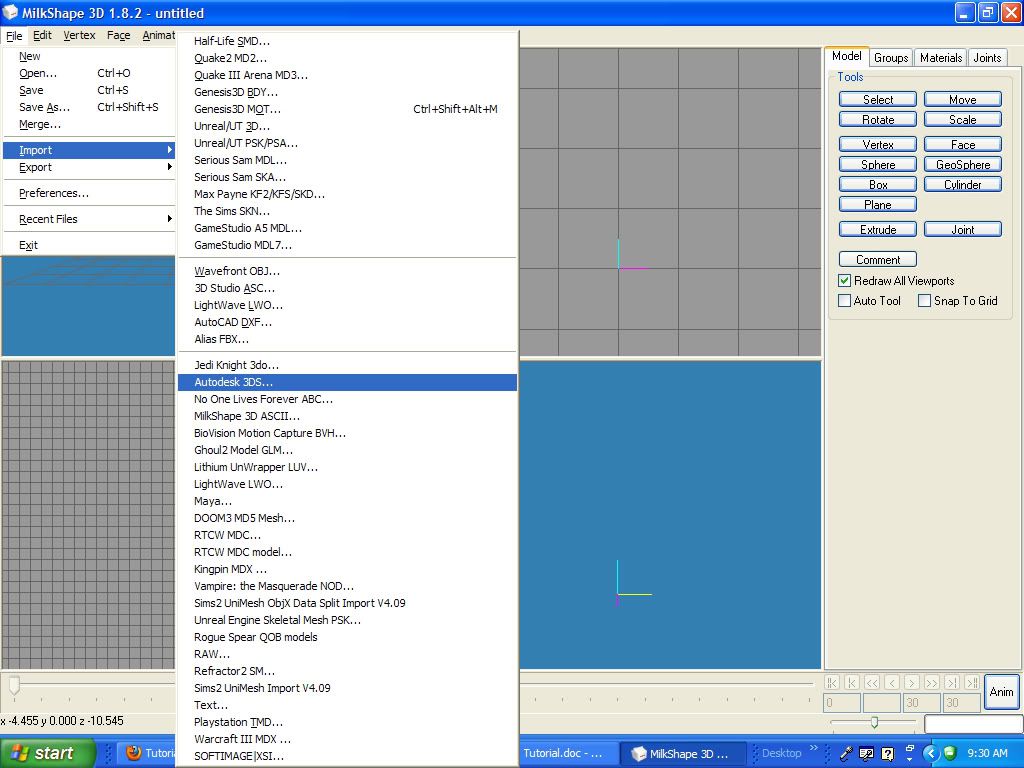
and we go to the folder we saved our .3ds file in and open that. Once it’s open we want to Ctrl+A to select all of the verts, next we click the rotate button under Model. Next, right-click in the bottom-right window and choose Reset View, it should look like this:
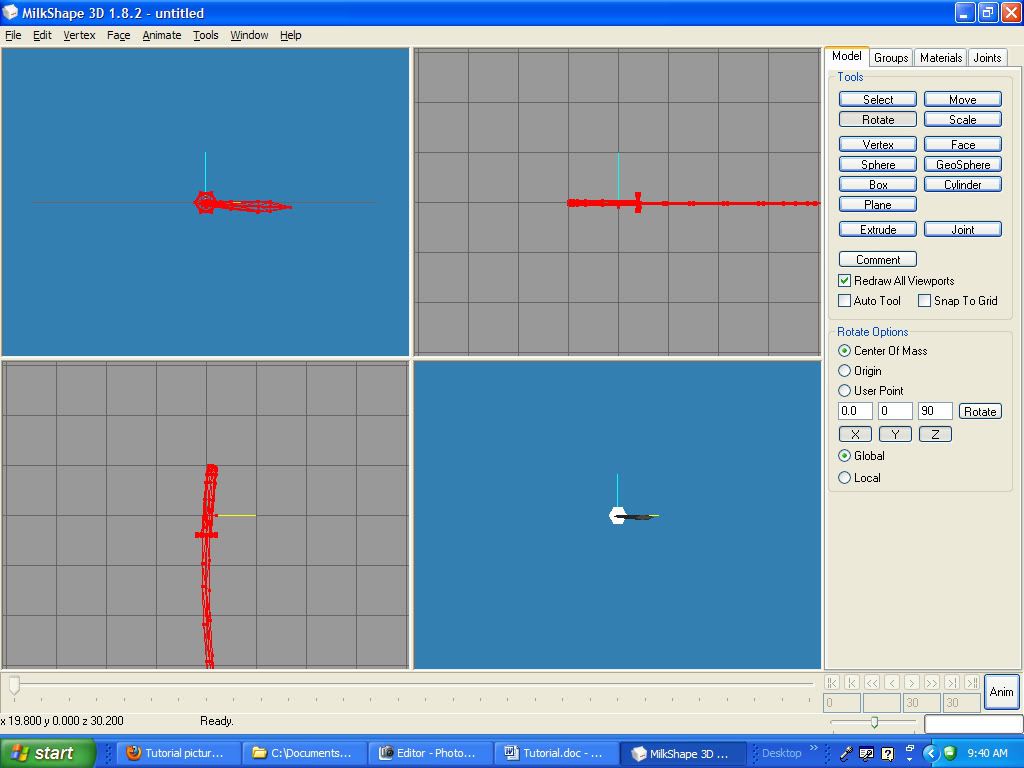
now in the Rotate options, click the bubble labeled Origin {this will do the rotating on the tag_parent’s axis so we wont have to worry about moving it into position} and in the X coordinate we want to type in -90 and hit the Rotate button next to the Z coordinate. Now our sword is pointing straight up, that’s all we need to do there:
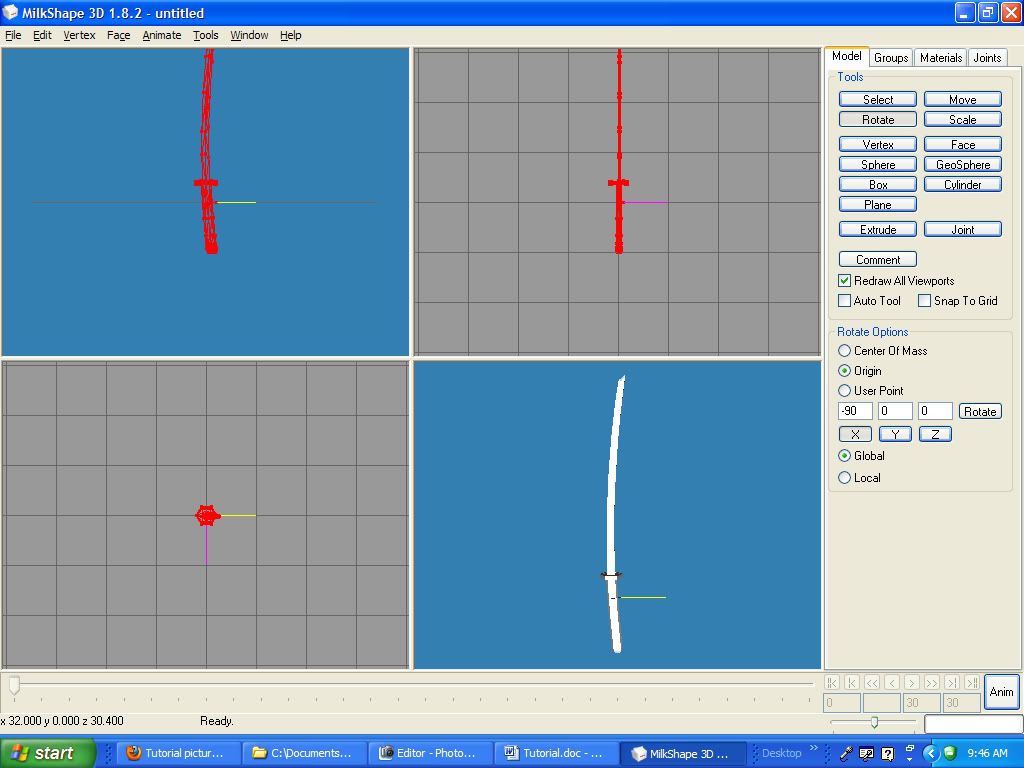
{note: its important to also save your weapons under the Milkshape file format .ms3d so that you have that to come back to if there's any more editing needed}
Step 11: While still in Milkshape, go up to the Tools Menu, choose Quake III Arena>Generate Control File…, this opens another new window for us to save a text document with the extension .qc {this file is what solidifies the texture settings we made back in 3DS Max, it is also very important that you use the swords name from before here}. This is what the .qc will look like:
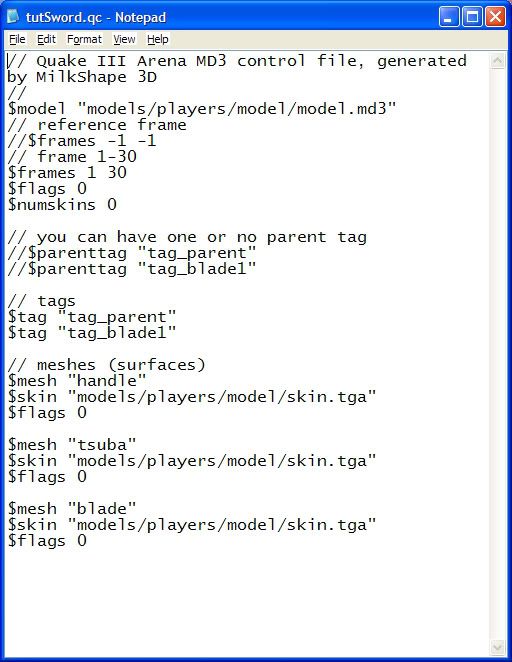
looks pretty confusing huh? Well it’s actually pretty simple once you do it a few times, just change all of the models/players/model to the swords folder location, in my case its models/weapons2/tutsword and change the skin.tga to the name of whatever texture you made for the piece it says. An example for me would be:
$mesh "handle"
$skin "models/weapons2/tutsword/tutHandle.tga"
$flags 0
And so on {be sure to have saved all of your textures as .jpg}. Same goes for the top area; change model.md3 to swordname.md3, or in my case tutsword.md3:
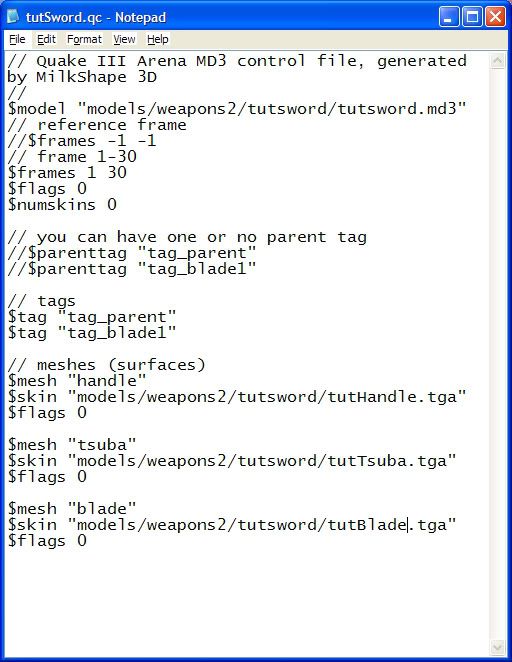
Ok, your control file is done, just save it and go back to Milkshape. Go to File>Export>Quake III Arena MD3… and saving in your swords corresponding folder by the same name as the .qc file {that’s important, otherwise it wont work}. Ok you are done in Milkshape, close it and go to the folder that you just saved your .md3 in.
Step 12: Once in your swords folder double-click the .md3 you just made {this is assuming you downloaded the MD3Viewer linked above, if this is the first time you used this file format your computer may ask you what program you want to use to open it, choose the md3viewer when a list pops up} once the program opens we will see our sword:
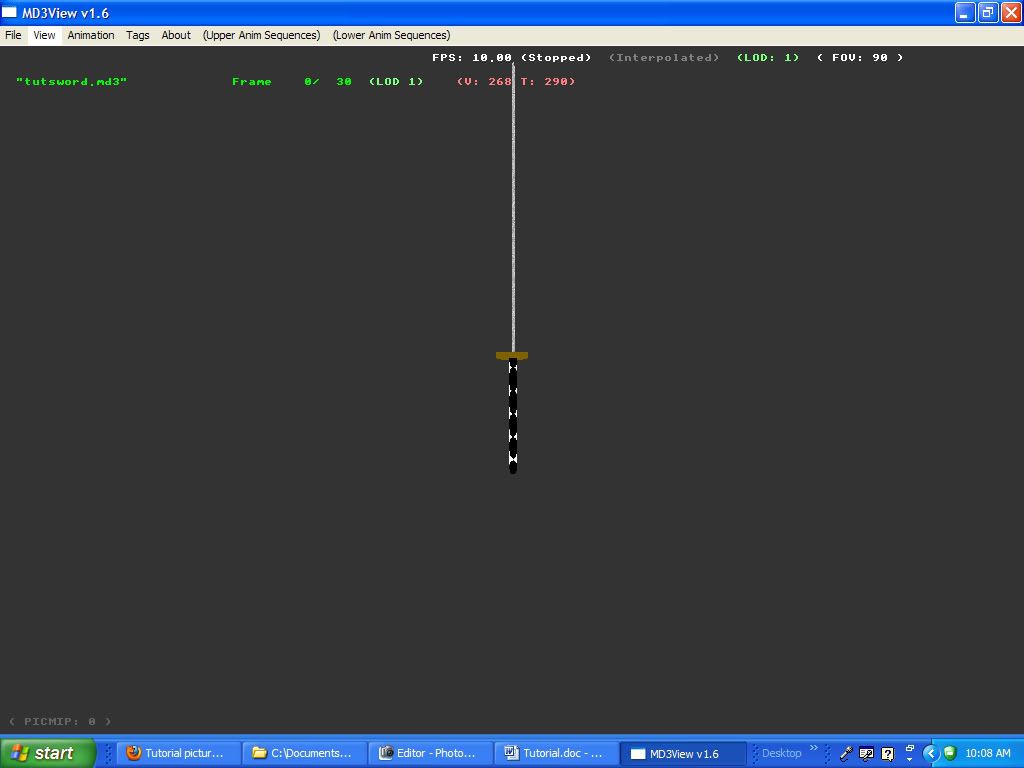
there isn’t much that needs to be done in this program, so all we have to do is go to File>Export as GLM (Ghoul 2) *without* 90-degree skewing (added for JKA) {long export name I know XD} when the Query box pops up asking if we are sure say Yes as well as Yes to the next one and OK on the last one, there we are all done with MD3View.
Step 13: Now go back to the swords folder and double click the .glm file {the same process as the MD3Viewer, select ModView from the list to open it} and this will open up:
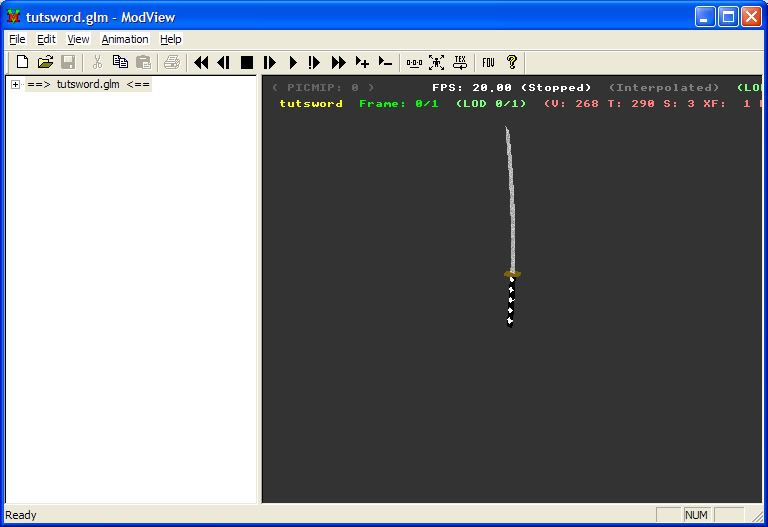
here we can fix any texturing issues and so on, but that’s not important at the moment. Close ModView.
Step 14: now the fun part, making our saber file. I personally learned how to make these by looking at the original files as well as the one that names off several of the command strings. So what we want to do first is open Notepad the copy and paste these bits in:
*Console Saber Name*
{
name "*Hilt List Name*"
saberType SABER_SINGLE
saberModel "models/weapons2/*YourSwordsFolder*/*YourSwordsName*.glm"
soundOn "sound/weapons/sword/draw1.mp3" {if using a sword model}
soundLoop none
soundOff none
saberLength *40* {40 is the default here but you may find that the blade length doesn’t fit the models blade so it may take some adjusting}
noblade *1* {you can use 1 or 0, 0 will make a saber blade visable, you may want to leave it as 0 until you know the blade length is accurate}
noWallMarks *1* {may use 1 or 0 just as it says it wont leave a mark on walls
onInWater *1* {not sure what this does lol, but I leave it as 1, you can also use 0}
idleInBack *1* {use 1 or 0, o will make it stay in your hand when the saber isn’t active, otherwise 1 makes it show up on your back instead}
spinsound "sound/weapons/sword/spin.mp3"
swingSound1 "sound/weapons/sword/swing1.mp3"
swingSound2 "sound/weapons/sword/swing2.mp3"
swingSound3 "sound/weapons/sword/swing3.mp3"
fallSound1 "sound/weapons/sword/fall1.mp3"
fallSound2 "sound/weapons/sword/fall2.mp3"
fallSound3 "sound/weapons/sword/fall3.mp3"
hitSound1 "sound/weapons/sword/stab1.mp3"
hitSound2 "sound/weapons/sword/stab2.mp3"
hitSound3 "sound/weapons/sword/stab3.mp3" {the sound strings are to make it more sword like}
}
*Wording* - change to the correct words you need
So here is how mine would look:
Katana
{
name "Katana"
saberType SABER_SINGLE
saberModel "models/weapons2/tutSword/tutSword.glm"
soundOn "sound/weapons/sword/draw1.mp3"
soundLoop none
soundOff none
saberLength 40
noblade 0 {for testing first}
trailStyle 1
noWallMarks 1
onInWater 1
idleInBack 1
spinsound "sound/weapons/sword/spin.mp3"
swingSound1 "sound/weapons/sword/swing1.mp3"
swingSound2 "sound/weapons/sword/swing2.mp3"
swingSound3 "sound/weapons/sword/swing3.mp3"
fallSound1 "sound/weapons/sword/fall1.mp3"
fallSound2 "sound/weapons/sword/fall2.mp3"
fallSound3 "sound/weapons/sword/fall3.mp3"
hitSound1 "sound/weapons/sword/stab1.mp3"
hitSound2 "sound/weapons/sword/stab2.mp3"
hitSound3 "sound/weapons/sword/stab3.mp3"
}
So just save it whatever you named your weapon and save it in the desktop>base>ext_data>sabers folder as a .sab file. Ok that’s all the configuring, now all we have to do is compile.
Step 15: Ok now the compilation, open Pakscape:
then go up to File>Open and choose the sword_template.pk3 that you downloaded earlier, it will look like this:
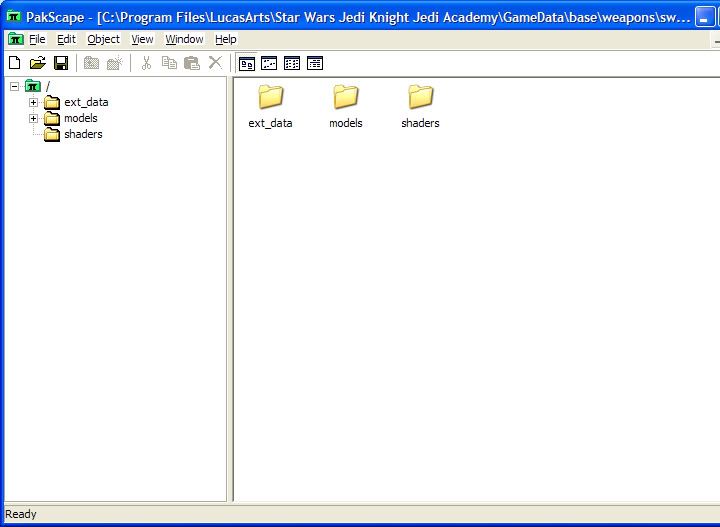
next we want to go back to our desktop and open the Base folder we made there ages ago and go to the Ext_data folder then Sabers. Copy the .sab file you made for your sword and paste it in the corresponding folder in the .pk3 you have opened in Pakscape:
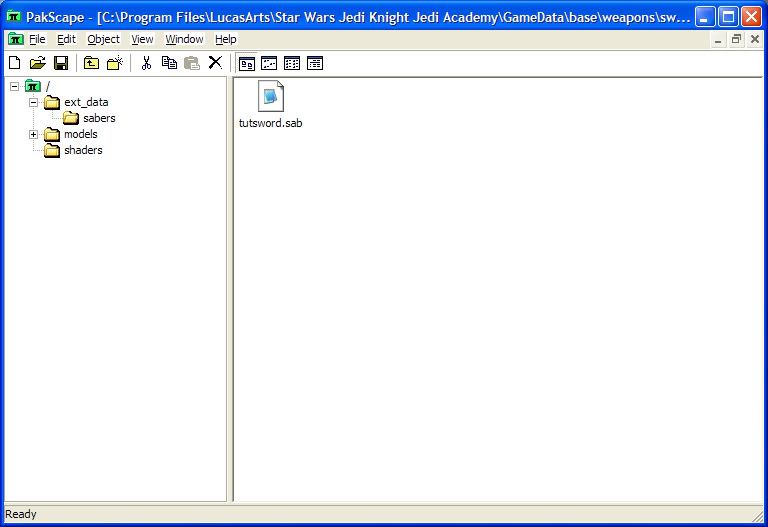
repeat the process by going to the Models>Weapons2 folder, copy the whole folder you made to hold the textures, .glm and .md3 files. And paste them into the same folder in Paksape:
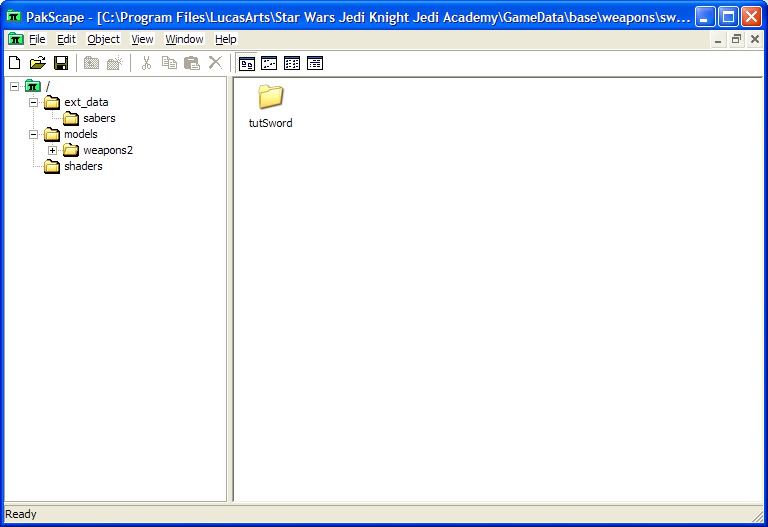
then go into that folder and delete anything unneeded, such as: all .psd files, the .qc file, all .bmp files, the .3ds file, and the .ms3d file.
Once that is done {while still in Pakscape} go to File>Save As and choose it the name you want, in my case I’m sticking with tutSword, and save it as a Quake 3 Pak (.pk3) in this directory: C:\Program Files\LucasArts\Star Wars Jedi Knight Jedi Academy\GameData\base. Ok you’re all done compiling, now just run the game and play solo MP to see your sword {please note you may not be able to see it in the Saber Hilt Selection menu, so you will have to open console and type: /saber swordName, in my case /saber Katana}:
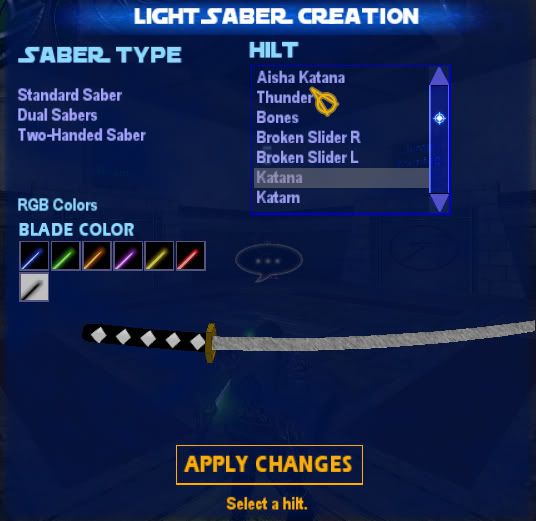

And there you have it, you just made your own weapon for Jedi Academy! :D
After its ingame its just a matter of fixing the kinks and textures, be sure to place the newly updated info in its proper place in the .pk3 afterwards. XD
Alright then, that’s pretty much all there is to it, good luck and have fun. ^_^
----------------------------------------------------------
woooooooooooooooooooooo that was alot of typing @_@
Hello new weapons makers :D
Today I will walk you through step by step on how to make a weapon for JA and to bring it to life in the game itself ^^
Note: if you need help at any time during this tut you can PM me on forums, MSN me at matt_hayes_gd@hotmail.com
Tools of the Trade
First off you want to make sure you have specific tools to do the job, you will need:
3D modeling programs: this tutorial will be using 3DS Max 2009 for the major bulk of the modeling process, as well as Milkshape 3D 1.8.2 for positioning and conversion {if you already have 3DS max, good for you, but milkshape is a must for this method >.>;}
Next you will be needing an .md3 importing script for 3DS Max
Ok, now for the most important programs:
MD3View - this program doesn’t require an install and allows you to see your model much how it would look ingame, this program is also important for you to convert to the final file type for the setup
Modview - this is another non installation program that allows you to again see your model much how it’s shown ingame, it also provides an easy way to reskin a model and let you know weather the model will work ingame {more on that topic later on}
Pakscape - another non installation program that lets you 'pack' your files together and save them as the desired format, .pk3
Photoshop or other imaging software - this is a must if you want a nice texture for your weapon ^^
Ok those are basically all the tools you will need to get going, please note that a lot of the time your first models that you send ingame might come out a little hokie.
Milkshape 3D 1.8.2: http://www.4shared.com/file/215063616/d ... 3d182.html
MD3 Importer: http://www.4shared.com/file/215045110/b ... 3-md3.html {note: this must be placed in this sort of directory- C:\Program Files\Autodesk\3ds Max 2009\Scripts\Startup. Also note that this only works for the 32bit version}
MD3View: http://www.4shared.com/file/215043786/a ... 3View.html
Modview: http://www.4shared.com/file/215043780/4 ... dView.html
Pakscape: http://www.4shared.com/file/215043776/2 ... Scape.html
Sword .PK3 Template: http://www.4shared.com/file/215435284/4 ... plate.html {we get to use this later}
Requirements and Parameters
Alright JA runs on a Quake 3 rendering engine, this means there's a limit to how fancy you can make your weapons. A model is comprised of 3 things that make up its structure: polys: the 'face' of the model, what makes it look the way it does, edges: lines that act as supports for the different pieces of polys, and verts: the little dots that act as anchors for the edges. The most important limitation we have is the vert limit; each object MUST have less than 1,000 verts, sounds simple huh, well it’s surprisingly hard to get the amount of detail you want and stay below that, trust me ;).
But you may be asking, what’s an object? Well, an object is what makes the model, take a sword for example; there are about 3 objects, a model that makes the handle, the guard and the blade, so basically you can have as much detail as you want so long as each piece has less than 1,000 verts. There is also a poly limit, but I actually never bothered to worry about that, can you imagine a sword model that has over 10,000 polys? XD
It is important to also have a special folder setup for moding and such, so go to your desktop and create a folder called Base, inside this folder make several other folders: ext_data, models and shaders. Inside ext_data make another folder called sabers. Inside models make another folder called weapons2. sabers is the folder that will hold the saber text file you will be making later on, and weapons2 will have another folder with whatever name you want this is where all the textures and other assorted files for your weapon will be saved. Shaders we may talk about later if you are interested enough.
Getting started
Alright, we are ready to make our sword models
Step 1: find you reference {just go on Google or yahoo image search and type in the sword you want, my example here is katana, and I found this:

Step 2: put the image in 3DS Max, just click hold and drag it to Max and it’ll show this box after it has been loaded:

You want to click OK, it’ll pop up a second time, this time you just hit the red X, now your reference image is on the viewport where you dropped it
step 3: fix any issue there may be with the image {squashed in some spots, you cant accurately zoom in} hold Alt and hit B, this will open this box:

you want to click the bubble labeled Match Bitmap, this will allow a checkbox to be clicked called Lock Zoom/Pan, check that box and hit OK. Now your ref is lock into place so that it’ll move with the model and zoom in and out with you model, this provides good accuracy:


Step 4: get modeling! Hit F3 on your keyboard to make polys visible. as this is a sword it makes sense to start with the blade, so go to your create menu, and choose the geometry button, it will automatically have the Standard Primitives selected in the drop down menu, then choose Plane, this will open a little entry menu underneath, here you want to change Length and Width Segs to 1. now click anywhere near the sword and drag out the panel you are making down its whole length {I usually edit my image to have the blade standing straight up and down but this is fine for now}:

now this is really important, it is always best to 0 out the coordinates of all of you objects, so we want to do this every time we make an object, so using the Move Transform Type-in dialog box we want to click inside each of the coordinates {X: side to side, Y: forward and back and Z: up and down} and make each number 0:


That will move our Pane to the exact center of the workspace
Now, right-click the object you made and choose Convert To, and then convert to Editable Poly:

this is really important as you want to be able to edit the structure of this plane
Now we want to hold Alt and hit X on our keyboard, this will make our currently selected object see through to make it easier to shape:

Now hit Ctrl+A to select all of your verts and move them to the area that the object was originally, this wont change the 0'd out coordinates we set earlier, as this is a deeper editing
next, we want to keep the verts option selected and right-click our mouse to open the verts editing tools and we want to choose cut:

this tool allows us to click anywhere on the object and insert a vert into that area and continue along the edge we want to make:

{to get out of this tool just right-click} and just continue cutting out the shape, once that's done click and drag your select tool over the outer verts {hold Ctrl while doing this to select other verts that are out of reach normally} that we don’t want, in my case its the 3 verts that are currently red, then hit Delete:

And walla, a not so great looking blade, you can select individual verts that you created and re-position them the way you want to make them fit better. So continue using the cut tool to make the edge beginning of the blade and so on:

ok, now that our blade is better looking we want to go the poly editing menu:

and then hit Ctrl+A to select all of our blades polys:

go down the poly editing menu and choose Extrude:

and that will open this dialog box:

we want to be in Perspective view for this part, the Extrude editor make the polys you select spring forward depending on the number we have entered:

in this case I have 10 entered, but that’s a bit much, so play around with the thickness until you find one you like, in my case 2.0 is just fine:

{please note that this is actually half the blade, the other half we will be making soon} once that’s extruded, go back to vertex editing and choose Target Weld.
This tool lets you select 1 vert and then another and the two will be joined together, be prepared to hit Ctrl+Z to fix any mistakes you may make, as separating welded verts is a difficult matter:

now we want to weld all the verts on the edge side of the blade:

now that our sword has a blade lets make the other half of it, up in the right hand corner is a tool called Mirror:

this comes in handy for making symmetrical models, such as sword blades, hit that button and this box will open:

change the Clone Selection options to Copy and the Mirror Axis to Y:

{note: the coordinates depend on how you have your blade setup, you may have to play around to get the desired effect} to get something like this:

Right-click and choose Attach from the menu that shows up:

this allows you to combine two objects together, click the other half of the blade you don’t have selected, now the 2 halves are 1, almost, go to vert editing mode and select all verts with Ctrl+A to select all of the verts, then right click and choose Weld:

now my vert count went from 64 to 47, that’s because all of the verts that were touching were combined, making it a complete merge. Alright, your blade is now done, next step!
Step 5: Next, we want to make the handle, in my case it's basically a cylinder. so we want to go back to the Create menu and choose Cylinder:

click and drag on the workspace to create the base of the cylinder:

then lift up without holding the mouse, then click again, and be sure to lower the Height Segments to 1 and the sides to 6-8, as anything higher is a waste of polys:

0 out the coordinates and convert to Editable Poly like you did for the blade before:

then select all the verts and move/rotate it into place:

switch over to the Edge editing menu:

and select the edges that make up the sides of the cylinder:

and right-click then choose Connect:

this creates new edges that encircle the edges you had selected:

you can use this to edit the handle in ways that make it fit the reference. now that our handle fits the reference it obviously shouldn’t stay circular, so lets go back to verts and select them all and use the Select and Non-uniform Scale tool:

{note, to get the tool click and hold the Uniform Scale tool until all 3 show up, choose the second one} we then want to decrease the Y coordinate to 50% to squash the cylinder:

that’s just about right for my handle. Ok the handle is done for now, we don’t have to bother with the pommel {in my case I just made multiple Edge connections and scaled them to round them off}:

Step 6: now we want to make the handle guard, or tsuba. in my case its just a flat cylinder, so ill start by making that, mine has 6 sides, 20.75 Radius, 3.0 Height and 1 Height segment:

now 0 it out and all that other good stuff, and go to the Polygon selection menu and select the top and bottom polys:

next go down the list of options and choose Inset to open this box:

Inset creates more edges inside of the selected polys:

in my case Inset Amount of 1.0 is a bit too little, so we will go with 3.0:

next we want to select the new polys that were created just now and choose the Extrude option to open this box:

In my case 10 is way too much so lets go with 1.5. And we get this:

so now we want to Rotate and position our tsuba correctly:

Ok the sword is all done and the entirety of the model has only 151 Verts and 132 Polys, it’s a pretty low-key model and should run smoothly
Step 7: alright next is one of the hard parts, UV Mapping. What is UV Mapping? It’s a process a model goes through to determine how textures lay on its surface. UVs are a series of dots and lines that are the framework of a model, similar to the edges and verts. so first what we want to do is select each piece of our model and apply an Unwrap UV Modifier, this is found in the little Drop-down Menu called Modifier List {its alphabetical so it shouldn't be hard to find}:

select the Face Selection option in the Unwrap UV menu and hit Ctrl+A to select all the polys, the model will be highlighted in red and have various yellow lines all around. now go down the list of settings and under Map Parameters click the Y bubble and click the Quick Planar Map:

now we go up and choose Edit... in Parameters, that will open this window:

this window is the UV Editing Window, here you can switch between vert, edge and face selection so shape your UVs to the way you want them to be laid out, for the blade of the sword of course you want to make it symmetrical so the main faces need to lay on top o each other. and we also want to get the faces on the back of the blade separated so that they don’t look bad, to do this we select them all normally and then Planar using X and use the Quick Planar button from earlier:

after the UVs have been placed the way you want go up to the Tools Menu of the UV Editor and choose Render UVW Template..., this will open another box, when that box opens you want to hit the Render UV Template button to open this window:

then you want to hit the save button {looks like a floppy disk} and save it as a .bmp in this directory: Desktop\base\models\weapons2\tutSword {or w/e you chose to name your weapons folder, yes it IS important to save it there} {please note that this image is automatically saved as 512x512 dimensions}. so just repeat this step until you have all the UVs made, if you are patient enough you can even combine all the UVs together as one image, but that’s a tad difficult already and this tutorial is waaaaay too long as it is XD
Step 8: now we take care of the basic textures, nothing fancy just a quick mock-up in Photoshop, or whatever imaging software you use {we can worry about the fancy stuff in Modview}. ok so we have the textures setup to be added to the model, so what we want to do is hit the M button on our keyboard, that opens the Material Editor:

this is what determines the basic textures on our model, so what we want to do is go down to the Maps menu and click on the button labeled None on the Diffuse Color line, this will open another window, here we want to double-click Bitmap, this'll open another window where we can open our .psd files, so select them from where you saved them. now you want to click and drag the new materials you opened over to their corresponding pieces {be sure to also click the little button that is a blue and white checkered cube}:

now we just want to select all the pieces of the model and go up to the Group menu and click Group, then hit OK. There, now our model is all together and we can now complete the next step.
Step 9: ok, now we want to go to the Utilities Menu {it looks like a little hammer} and hit the MAXScript button. In the Utilities drop-down menu choose Quake3 MD3 Import. then scroll down a bit more and click the Load all bubble under Tags, then hit the Import MD3... button, now while that loading window is open go run Pakscape and go to your C:\Program Files\LucasArts\Star Wars Jedi Knight Jedi Academy\GameData\base folder, and open the assets1.pk3, now go to the models/weapons2 folder in Pakscape. You want to copy the saber folder and past it in the same location in that Base folder on our desktop. now go back to 3DS Max and go through the folder locations till you get to the Saber folder you just pasted into our base/models/weapons2 folder, select the file called saber_w.md3:

this will open a small Katarn hilt with 2 triangles on it in your weapons space {although most likely you cant see it as most of the times the model you make is waaaaay too big so we will have to shrink it down} so now we scale the whole weapon we made to make the handle of the weapon roughly fit the saber hilts' size. I bet you're wondering what the little triangles are, well these are called tags, they are used by the game to determine where certain things go; saber blades, where the hilt goes in the users hand, ect.... so we have 2 tags: tag_parent and tag_blade1 {FYI the number is used by the game as well, as there are weapons in the game that have more than one blade the number determines which blade is assigned to that place more on that issue later} so we want to highlight the Katarn saber pieces, excluding the tags and delete them so that only the tags remain, and they are nicely placed on our weapon where we want them:

alright so now our weapon is scaled and tagged next we want to go to File/Export, and we want to export it as a .3DS file type and instead of our default location we want to save it in the same folder as its images {be sure to maintain names here, its very important to keep it simple}.
Step 10: ok now that we have our .3DS we can close 3DS Max and open Milkshape 1.8.2, once it is running we go up to File>Import>Autodesk 3DS:

and we go to the folder we saved our .3ds file in and open that. Once it’s open we want to Ctrl+A to select all of the verts, next we click the rotate button under Model. Next, right-click in the bottom-right window and choose Reset View, it should look like this:

now in the Rotate options, click the bubble labeled Origin {this will do the rotating on the tag_parent’s axis so we wont have to worry about moving it into position} and in the X coordinate we want to type in -90 and hit the Rotate button next to the Z coordinate. Now our sword is pointing straight up, that’s all we need to do there:

{note: its important to also save your weapons under the Milkshape file format .ms3d so that you have that to come back to if there's any more editing needed}
Step 11: While still in Milkshape, go up to the Tools Menu, choose Quake III Arena>Generate Control File…, this opens another new window for us to save a text document with the extension .qc {this file is what solidifies the texture settings we made back in 3DS Max, it is also very important that you use the swords name from before here}. This is what the .qc will look like:

looks pretty confusing huh? Well it’s actually pretty simple once you do it a few times, just change all of the models/players/model to the swords folder location, in my case its models/weapons2/tutsword and change the skin.tga to the name of whatever texture you made for the piece it says. An example for me would be:
$mesh "handle"
$skin "models/weapons2/tutsword/tutHandle.tga"
$flags 0
And so on {be sure to have saved all of your textures as .jpg}. Same goes for the top area; change model.md3 to swordname.md3, or in my case tutsword.md3:

Ok, your control file is done, just save it and go back to Milkshape. Go to File>Export>Quake III Arena MD3… and saving in your swords corresponding folder by the same name as the .qc file {that’s important, otherwise it wont work}. Ok you are done in Milkshape, close it and go to the folder that you just saved your .md3 in.
Step 12: Once in your swords folder double-click the .md3 you just made {this is assuming you downloaded the MD3Viewer linked above, if this is the first time you used this file format your computer may ask you what program you want to use to open it, choose the md3viewer when a list pops up} once the program opens we will see our sword:

there isn’t much that needs to be done in this program, so all we have to do is go to File>Export as GLM (Ghoul 2) *without* 90-degree skewing (added for JKA) {long export name I know XD} when the Query box pops up asking if we are sure say Yes as well as Yes to the next one and OK on the last one, there we are all done with MD3View.
Step 13: Now go back to the swords folder and double click the .glm file {the same process as the MD3Viewer, select ModView from the list to open it} and this will open up:

here we can fix any texturing issues and so on, but that’s not important at the moment. Close ModView.
Step 14: now the fun part, making our saber file. I personally learned how to make these by looking at the original files as well as the one that names off several of the command strings. So what we want to do first is open Notepad the copy and paste these bits in:
*Console Saber Name*
{
name "*Hilt List Name*"
saberType SABER_SINGLE
saberModel "models/weapons2/*YourSwordsFolder*/*YourSwordsName*.glm"
soundOn "sound/weapons/sword/draw1.mp3" {if using a sword model}
soundLoop none
soundOff none
saberLength *40* {40 is the default here but you may find that the blade length doesn’t fit the models blade so it may take some adjusting}
noblade *1* {you can use 1 or 0, 0 will make a saber blade visable, you may want to leave it as 0 until you know the blade length is accurate}
noWallMarks *1* {may use 1 or 0 just as it says it wont leave a mark on walls
onInWater *1* {not sure what this does lol, but I leave it as 1, you can also use 0}
idleInBack *1* {use 1 or 0, o will make it stay in your hand when the saber isn’t active, otherwise 1 makes it show up on your back instead}
spinsound "sound/weapons/sword/spin.mp3"
swingSound1 "sound/weapons/sword/swing1.mp3"
swingSound2 "sound/weapons/sword/swing2.mp3"
swingSound3 "sound/weapons/sword/swing3.mp3"
fallSound1 "sound/weapons/sword/fall1.mp3"
fallSound2 "sound/weapons/sword/fall2.mp3"
fallSound3 "sound/weapons/sword/fall3.mp3"
hitSound1 "sound/weapons/sword/stab1.mp3"
hitSound2 "sound/weapons/sword/stab2.mp3"
hitSound3 "sound/weapons/sword/stab3.mp3" {the sound strings are to make it more sword like}
}
*Wording* - change to the correct words you need
So here is how mine would look:
Katana
{
name "Katana"
saberType SABER_SINGLE
saberModel "models/weapons2/tutSword/tutSword.glm"
soundOn "sound/weapons/sword/draw1.mp3"
soundLoop none
soundOff none
saberLength 40
noblade 0 {for testing first}
trailStyle 1
noWallMarks 1
onInWater 1
idleInBack 1
spinsound "sound/weapons/sword/spin.mp3"
swingSound1 "sound/weapons/sword/swing1.mp3"
swingSound2 "sound/weapons/sword/swing2.mp3"
swingSound3 "sound/weapons/sword/swing3.mp3"
fallSound1 "sound/weapons/sword/fall1.mp3"
fallSound2 "sound/weapons/sword/fall2.mp3"
fallSound3 "sound/weapons/sword/fall3.mp3"
hitSound1 "sound/weapons/sword/stab1.mp3"
hitSound2 "sound/weapons/sword/stab2.mp3"
hitSound3 "sound/weapons/sword/stab3.mp3"
}
So just save it whatever you named your weapon and save it in the desktop>base>ext_data>sabers folder as a .sab file. Ok that’s all the configuring, now all we have to do is compile.
Step 15: Ok now the compilation, open Pakscape:

then go up to File>Open and choose the sword_template.pk3 that you downloaded earlier, it will look like this:

next we want to go back to our desktop and open the Base folder we made there ages ago and go to the Ext_data folder then Sabers. Copy the .sab file you made for your sword and paste it in the corresponding folder in the .pk3 you have opened in Pakscape:

repeat the process by going to the Models>Weapons2 folder, copy the whole folder you made to hold the textures, .glm and .md3 files. And paste them into the same folder in Paksape:

then go into that folder and delete anything unneeded, such as: all .psd files, the .qc file, all .bmp files, the .3ds file, and the .ms3d file.
Once that is done {while still in Pakscape} go to File>Save As and choose it the name you want, in my case I’m sticking with tutSword, and save it as a Quake 3 Pak (.pk3) in this directory: C:\Program Files\LucasArts\Star Wars Jedi Knight Jedi Academy\GameData\base. Ok you’re all done compiling, now just run the game and play solo MP to see your sword {please note you may not be able to see it in the Saber Hilt Selection menu, so you will have to open console and type: /saber swordName, in my case /saber Katana}:


And there you have it, you just made your own weapon for Jedi Academy! :D
After its ingame its just a matter of fixing the kinks and textures, be sure to place the newly updated info in its proper place in the .pk3 afterwards. XD
Alright then, that’s pretty much all there is to it, good luck and have fun. ^_^
----------------------------------------------------------
woooooooooooooooooooooo that was alot of typing @_@
Last edited by BadWolf on Mon Feb 18, 2013 8:26 pm, edited 2 times in total.

~Come to bring the Lady of Time to her final destination, The Big Bad Wolf~


